

The Prospectors Page
We are currently looking for unpublished 1-2 page stories, preferably with photos, to boost our website content. The they must be true, and should deal with some aspect of mining, mining life, or mining culture. They do not need to be success stories, as failure is the best teacher. Humor is allowed, although it should be in good taste. We will pay $75 for any article that is printed.
7/27/22
California Sniping©8/21/2018
by Alan Chenworth
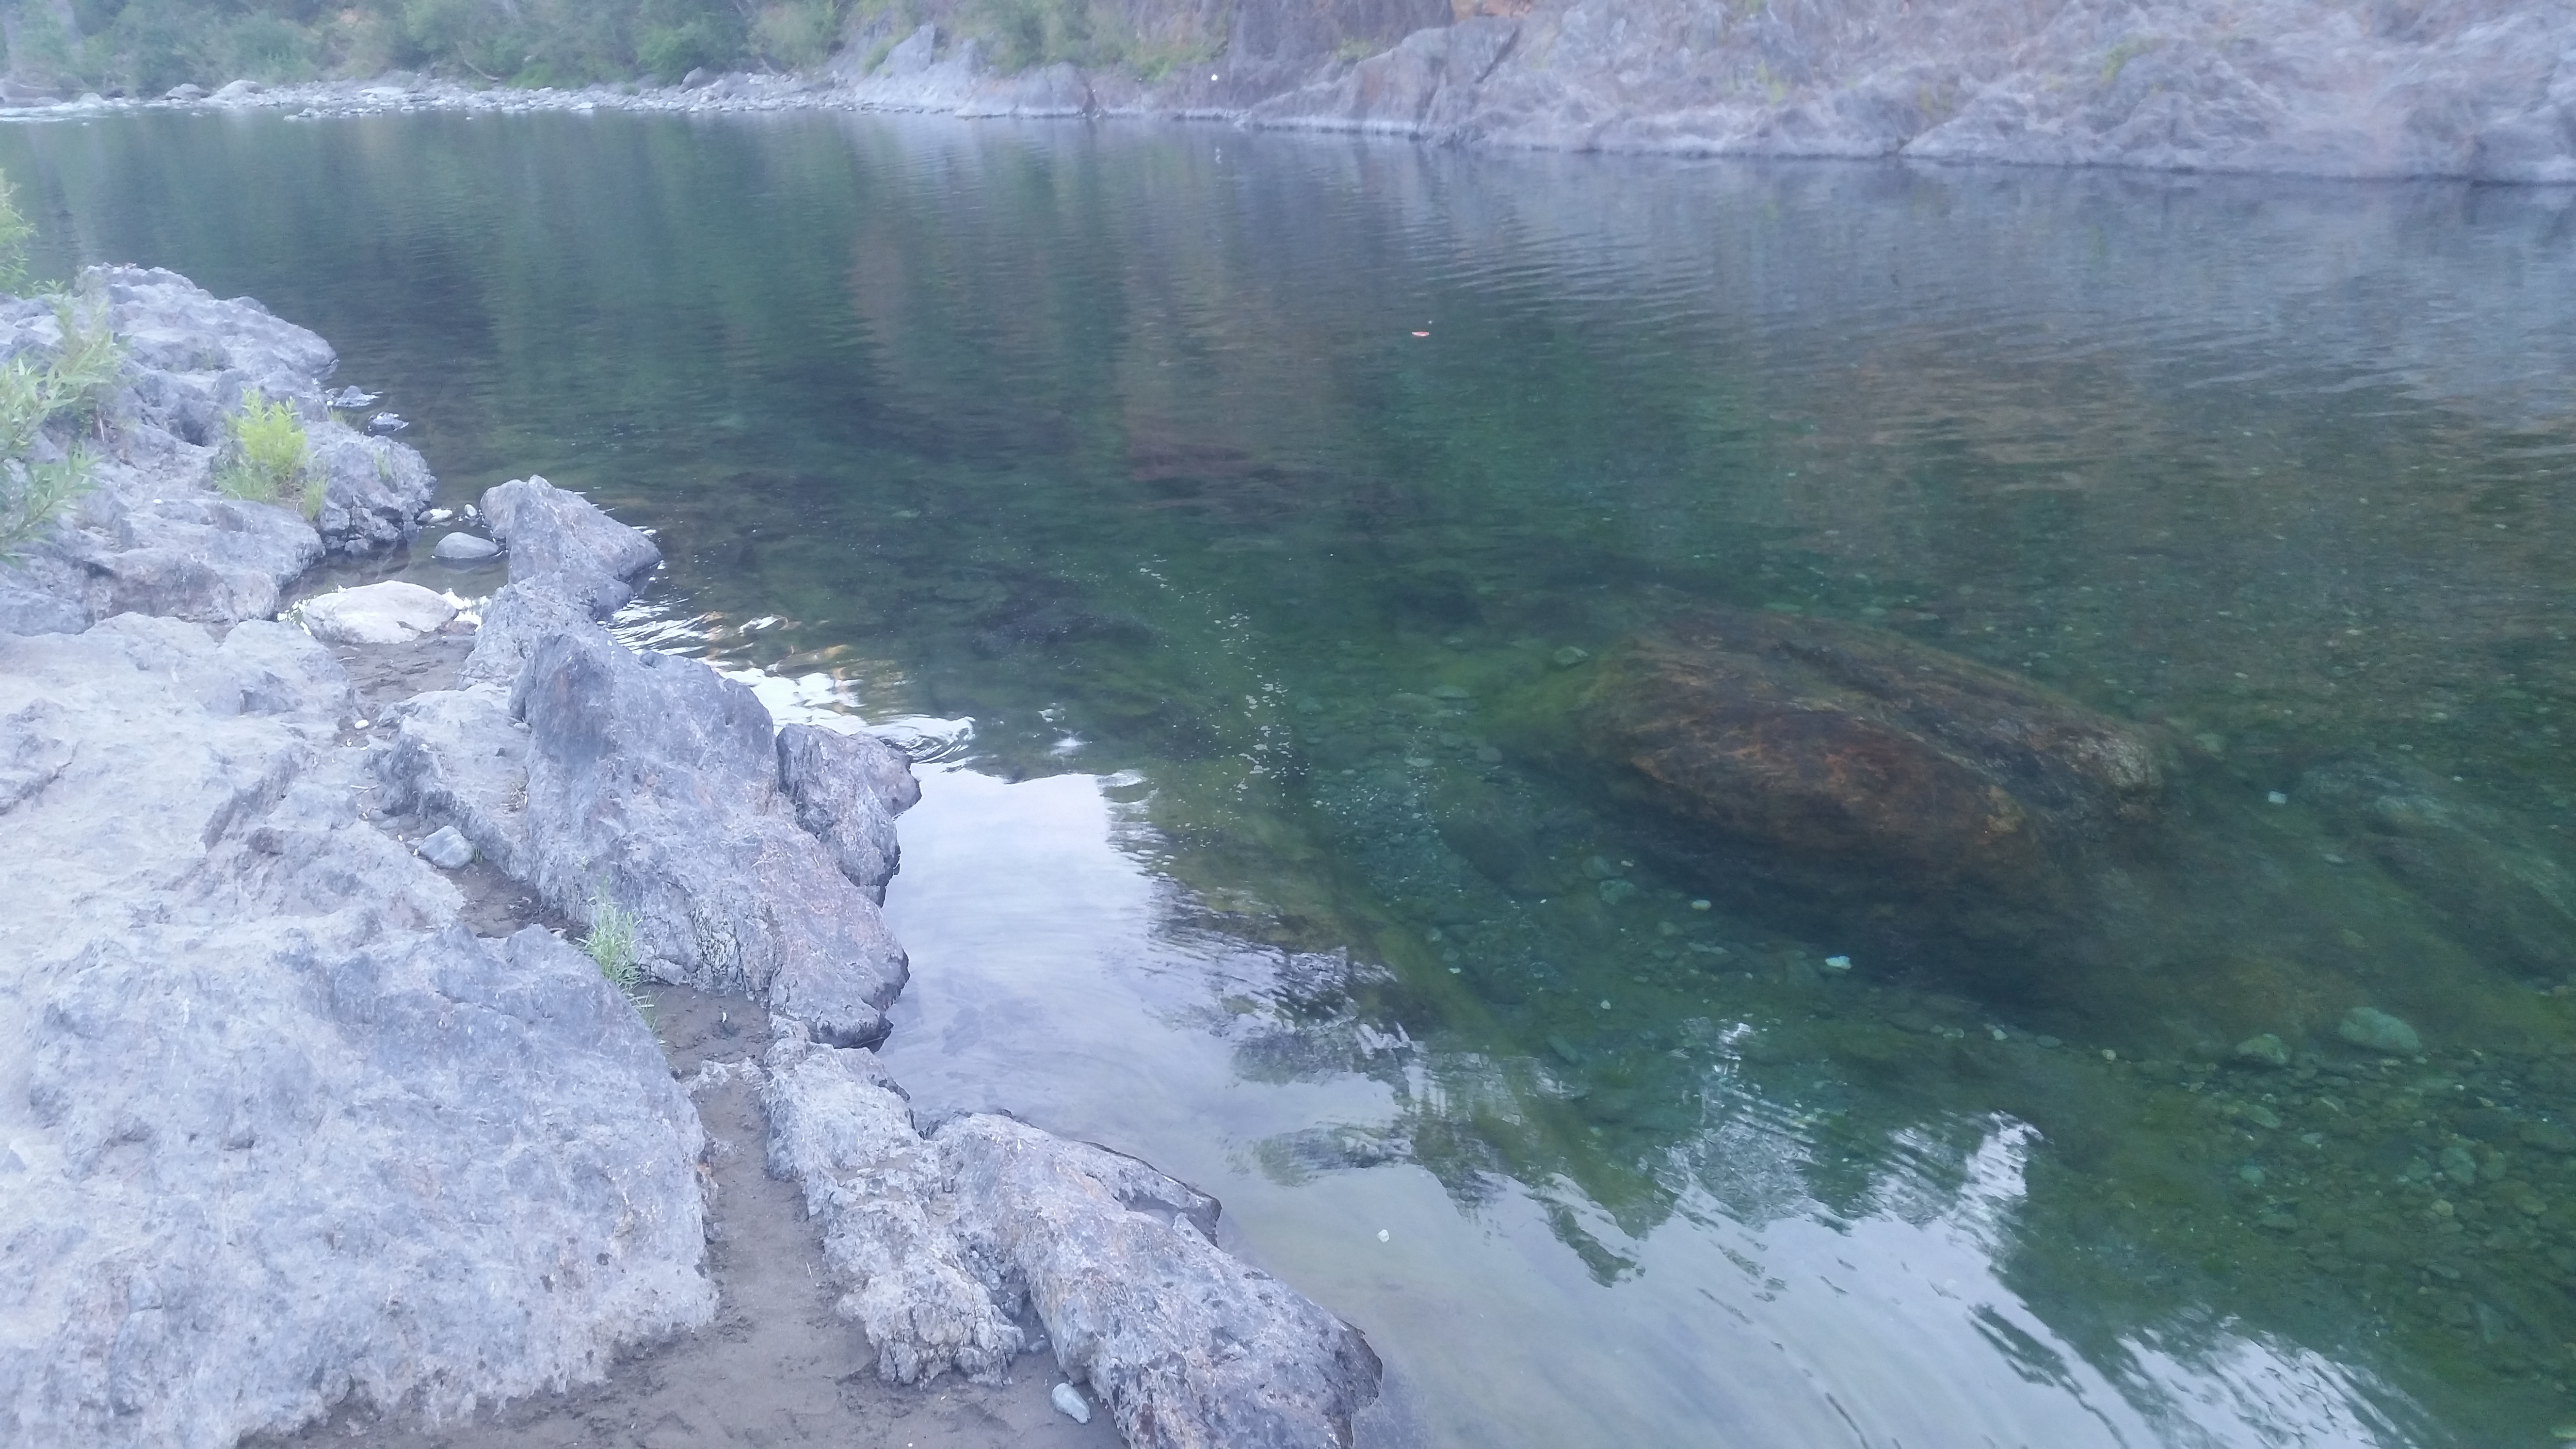
As California’s ban on dredging stretches into another year, I am finding other ways to get back into the water and go after that beautiful California gold. I decided it was time to try my hand at sniping for gold. It is one of the easiest and most affordable methods of gold mining, and the drought we are having is actually helping things along, as some of the deeper placers are becoming accessible due to low water levels.
Sniping the cracks can be done either above or below the water line. However, sitting on the dark, sun-scorched bedrock with sweat running into my eyes during the heat of summer—while using a bar and hammer to open the cracks—did not seem very appealing. So I opted for the under-water portion of the river. All I have to do is float down the river and pick large flakes and small nuggets out of cracks and crevices while staying cool in the summer heat.
After a bit of planning with the rest of the family, we decided to spend our time on the American River at the Auburn State Park. There are no claims to worry about, plenty of river to work on (two rivers and a number of creeks), and a campground to stay in. It has a long and rich history of gold mining, and it is not far from town or the Interstate, so access is good. We picked a long weekend in August—typically the best time to go as the water levels are low and the kids are still out of school—and made a trip out of it. It was a bit of a drive from our home in southern California, but we decided it would be the perfect place to go for some fun, sun and gold.
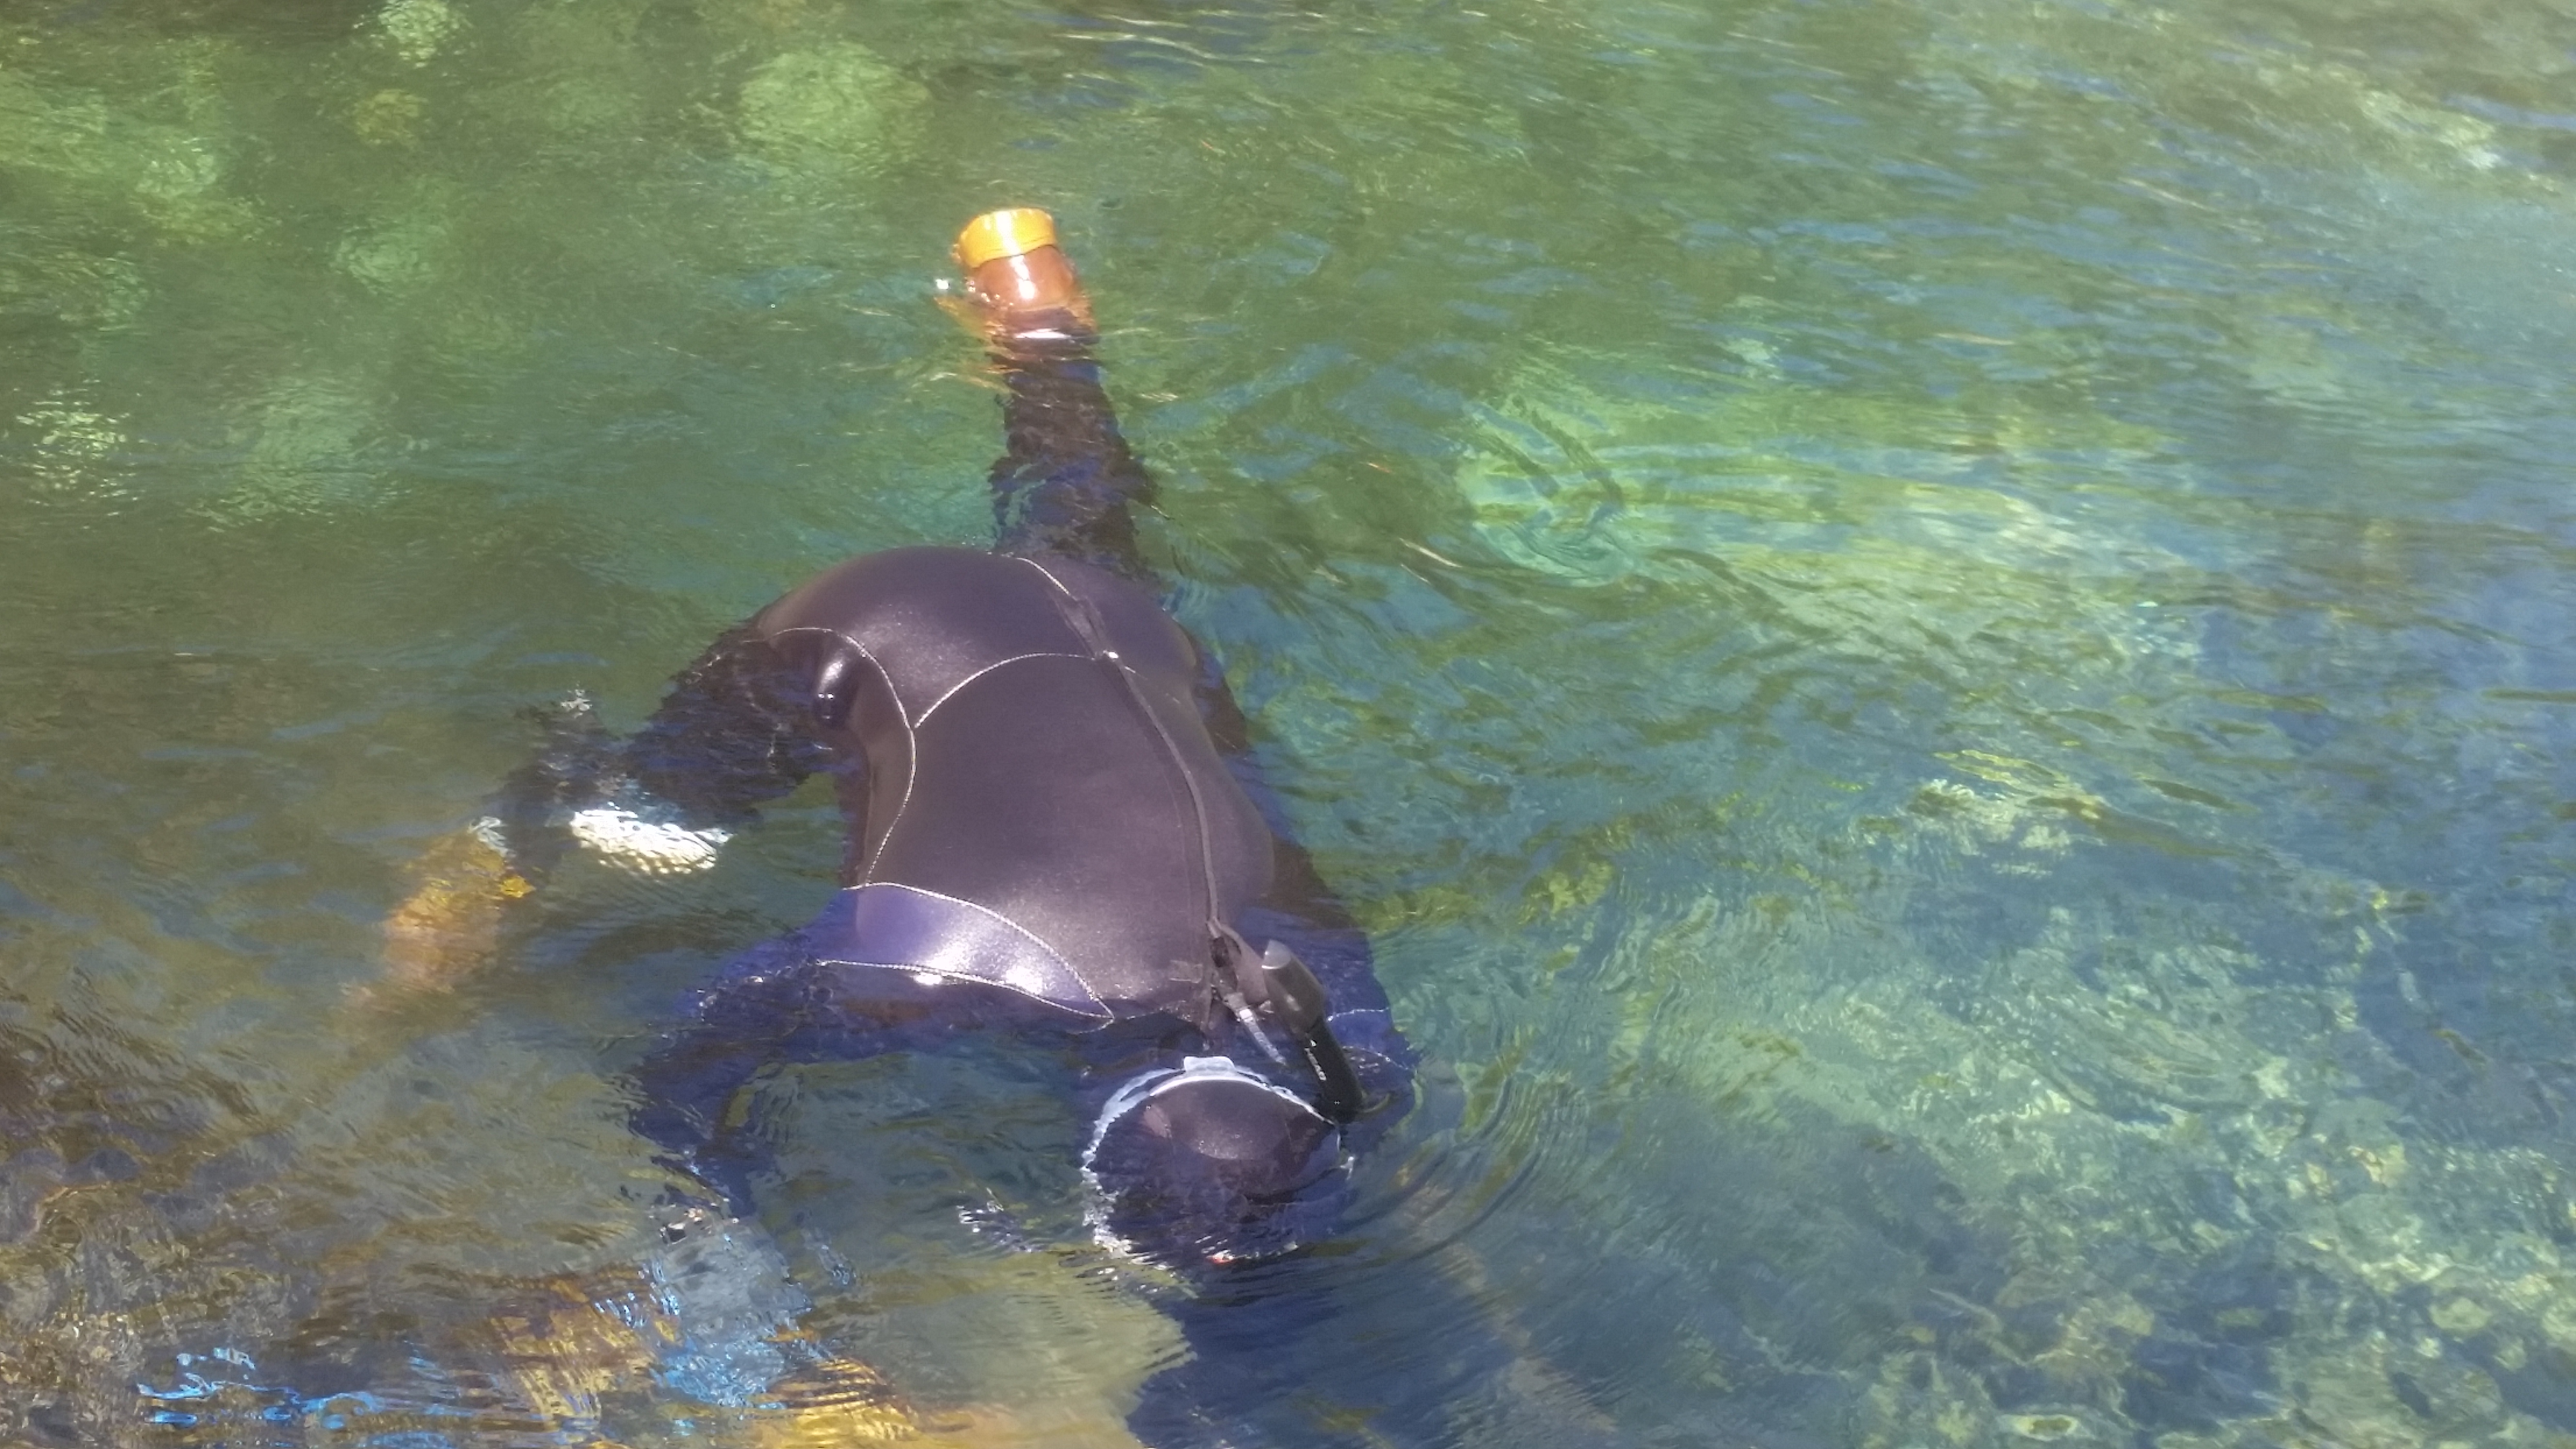
I also spent a few days getting outfitted for the trip. What do you need for sniping? While a wet suit really isn’t necessary if you work some of the warmer rivers, it really does allow you to stay under water and work all day—otherwise you will need to get out and warm up periodically. I invested in a good 5 mil thick, full-body wet suit and I have an old hood that has survived from my old dredging days. I also bought a good diving mask, snorkel and a bottle of anti-fog. Another really important accessory is a pair of good knee pads. A pair of $20 knee pads will save a lot of damage on an expensive wet suit.

As for tools needed to work under water, I generally travel light—partially due to the fact that I will be floating down a river and too much weight will make me sink. I have also found that I really don’t need much equipment to be productive. About 80% of my time I use nothing but a 20 oz rock hammer, a 17” blue construction bar (similar to a crow-bar, but not as long and curvy), and a large sniffer bottle. (NOTE: I put lead weights into the sniffer bottle to help it sink and stay on the bottom—and you must fill it with water). I put these tools into a small backpack and float along looking for likely cracks.
In the backpack, I also have a flat screw-driver, some thin crack-knives, tweezers, a bulb sucker, small black pan and a 16” crack-hook. (I have tied the crack-hook, bulb-sucker and pan together; and the crack-hook acts as an anchor, keeping it all from floating away).
I mentioned that I use the blue construction bar for most of the work. This bar has a 90-degree bend on one end and is flat on the other. This allows me to hammer it into cracks and crevices, so that I can open them up. It is also thin enough that it will fit into some very small cracks, and I can use it to scrape the material out of the crack.
The rock hammer is similarly useful—in fact, it is just about worth its weight in gold. When working the soft, well-foliated metamorphic rocks that are often found in the creeks of California, I can take the hammer and beat the rocks until they start to fall apart-it usually only takes a few blows to fracture the rock. I have been able to open up some nice cracks in large bedrock slabs by just breaking the rock out of the way.
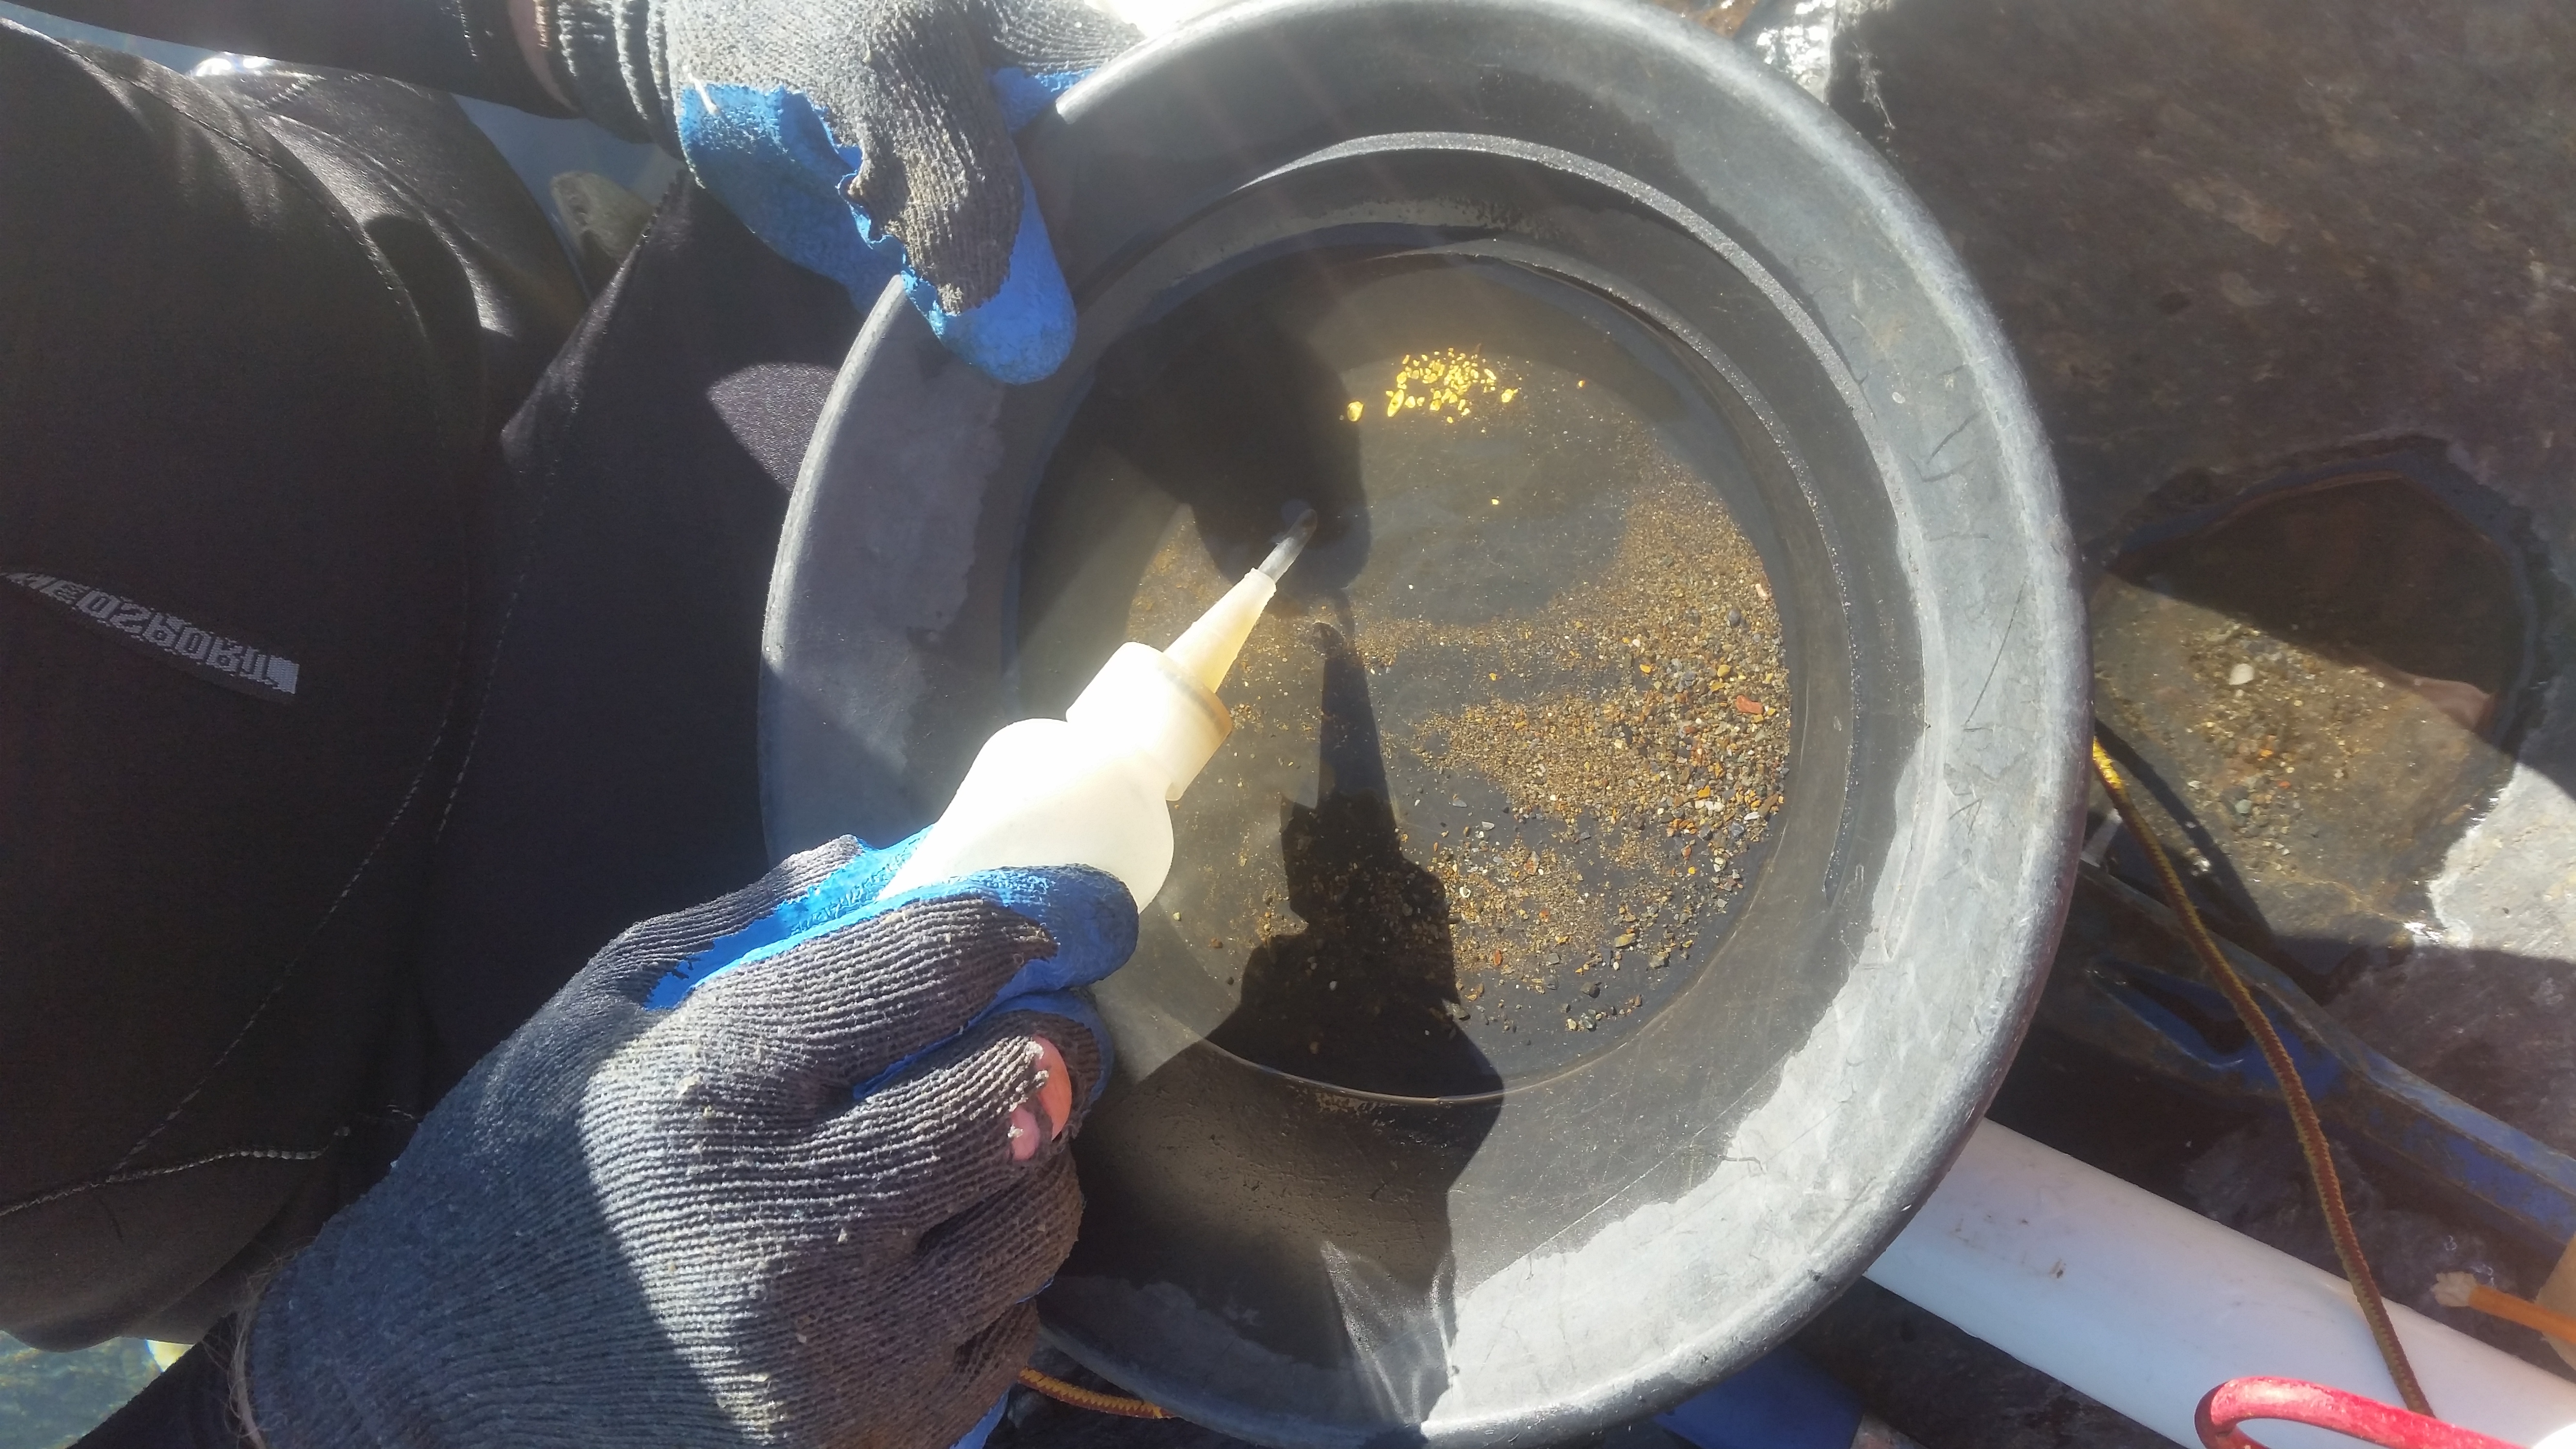
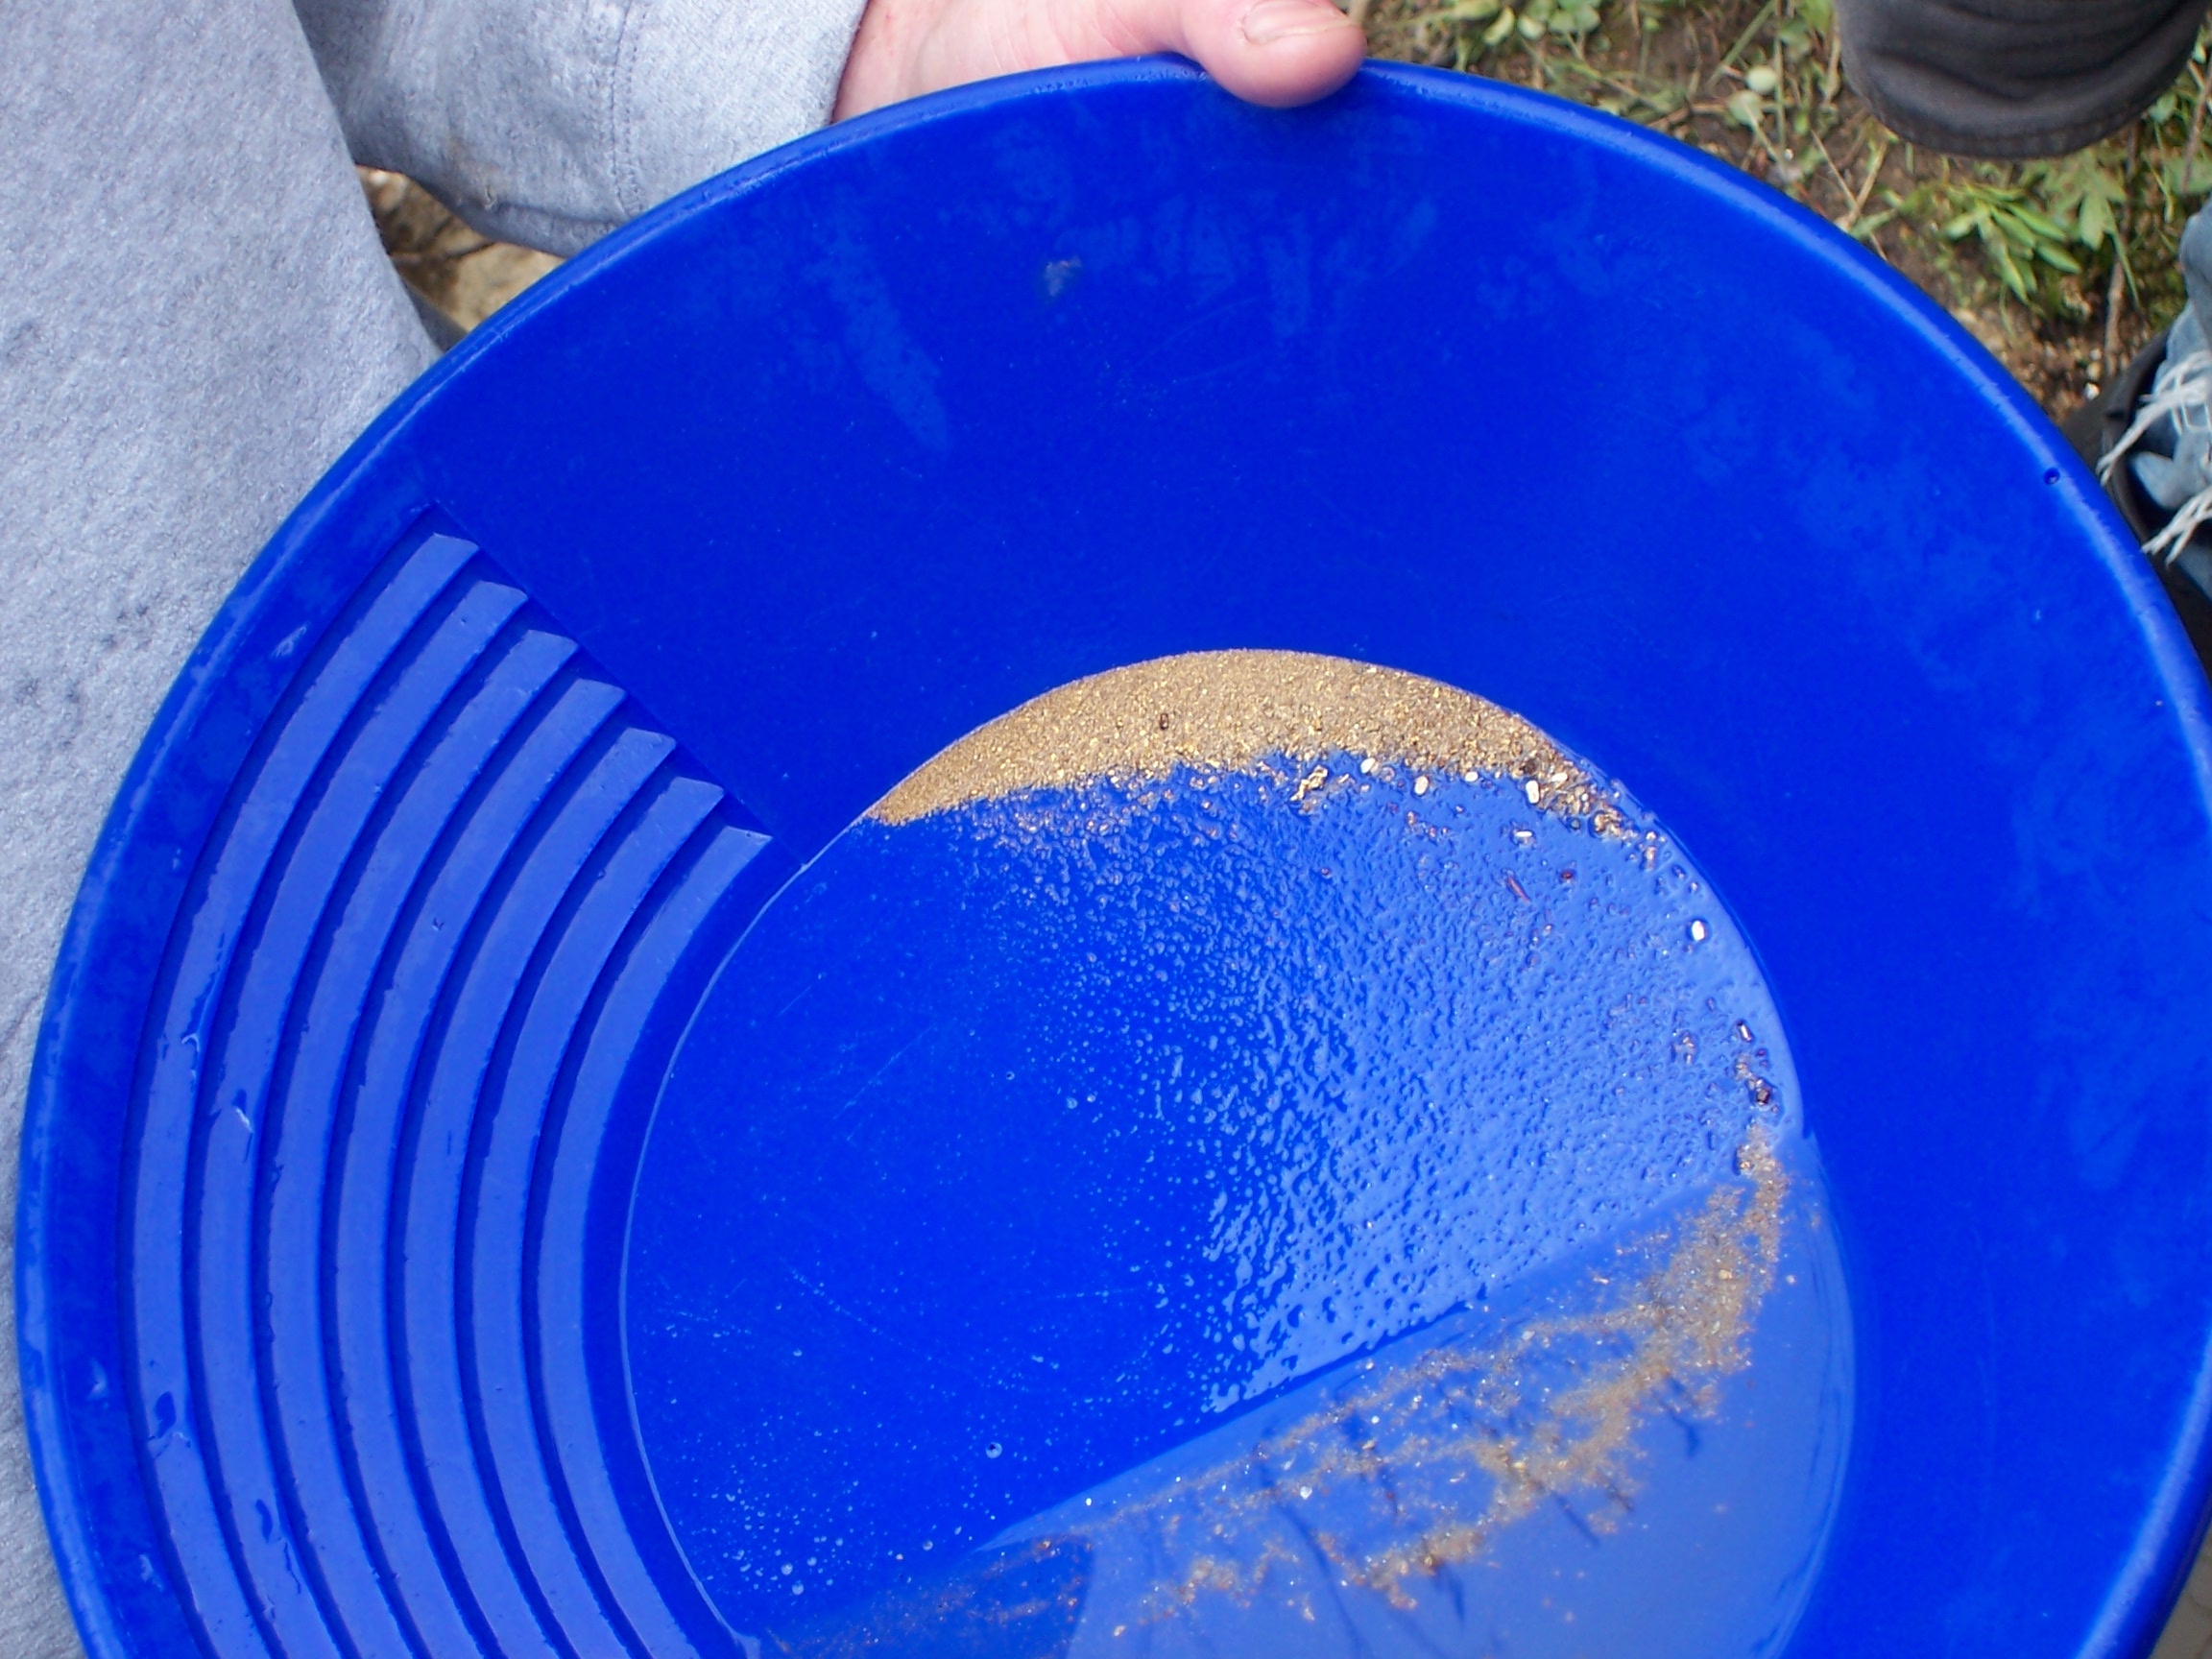
Once I have opened the crack, I take my hand and gently fan the crack. By doing this, I can wash away the clay, sand, pebbles or other light material. I also use this to blow away the “smoke” that you get as any clay is picked up by the current. Fanning this material will usually leave the heavy materials such as gold and lead behind—though you will find that flakes and fines can blow out of the cracks, especially if you are using a lot of force. As a general rule, I will suck up the gold as soon as I can see it, so that I don’t risk losing it. I will also usually clean the bedrock below and to the sides of the crack or vug that I am working before I open it, so that I have a clean catch area where I can see the gold and easily recover it (gold will quickly sink through any sand or gravel). As heavy as gold is, it is surprising how much it can move under water. If you do find a flake in a place that is relatively “safe,” you may want to spend a few minutes playing with it to get a feel for how gold moves under water and how much energy you can put into fanning out the crevices before you lose the gold.
I have spent many hours sniping on some of California’s most popular rivers, and am here to say that there is that there is still gold to be found. In some cases, there is still really good gold to be found. Many of these rivers have been hit hard: by the original miners, those who came after, then the dredgers who came and worked it again—but there is still gold. Many dredgers didn’t take the time to open up the small cracks, or maybe it was exposed bedrock when the dredger came through . . . (If there is no gravel to dredge, what is the point?) They simply moved on to another spot that had gravel. Also, it must be remembered that there is still gold bearing sediment upstream—the old hydraulic pits, the ancient north-south trending stream deposits, and the quartz veins that carry gold are still there and slowly putting their gold back into the rivers with every flood event. This gold is still making its way down river and into the cracks and crevices.
And every now and then, you will come across small areas that were simply missed by the old timers. On both of the last two trips I made to the American river, I found small vugs on the side of the river that were jam-packed with gold bearing gravel (a vug is a small bubble, hole or natural opening in the rocks). They were small, but appeared to have been untouched by past mining. I pulled a small nugget, some nice flakes and a bunch of fines from the little vug, and it was only a few inches wide.
While looking for a productive area to snipe you should always keep moving. If you don’t find gold, move on. If I have spent 10 or 20 minutes without gold, it is time to go. It doesn’t matter how good the crack looks—if I haven’t found gold yet, it probably isn’t there. Similarly, if I have found gold in an area, I will check the cracks and crevices around it. The dredger or miner that missed the gold in one crack probably missed it in the related ones around it. Similarly, the conditions that will deposit gold in one crack will likely allow for deposition in other nearby cracks.
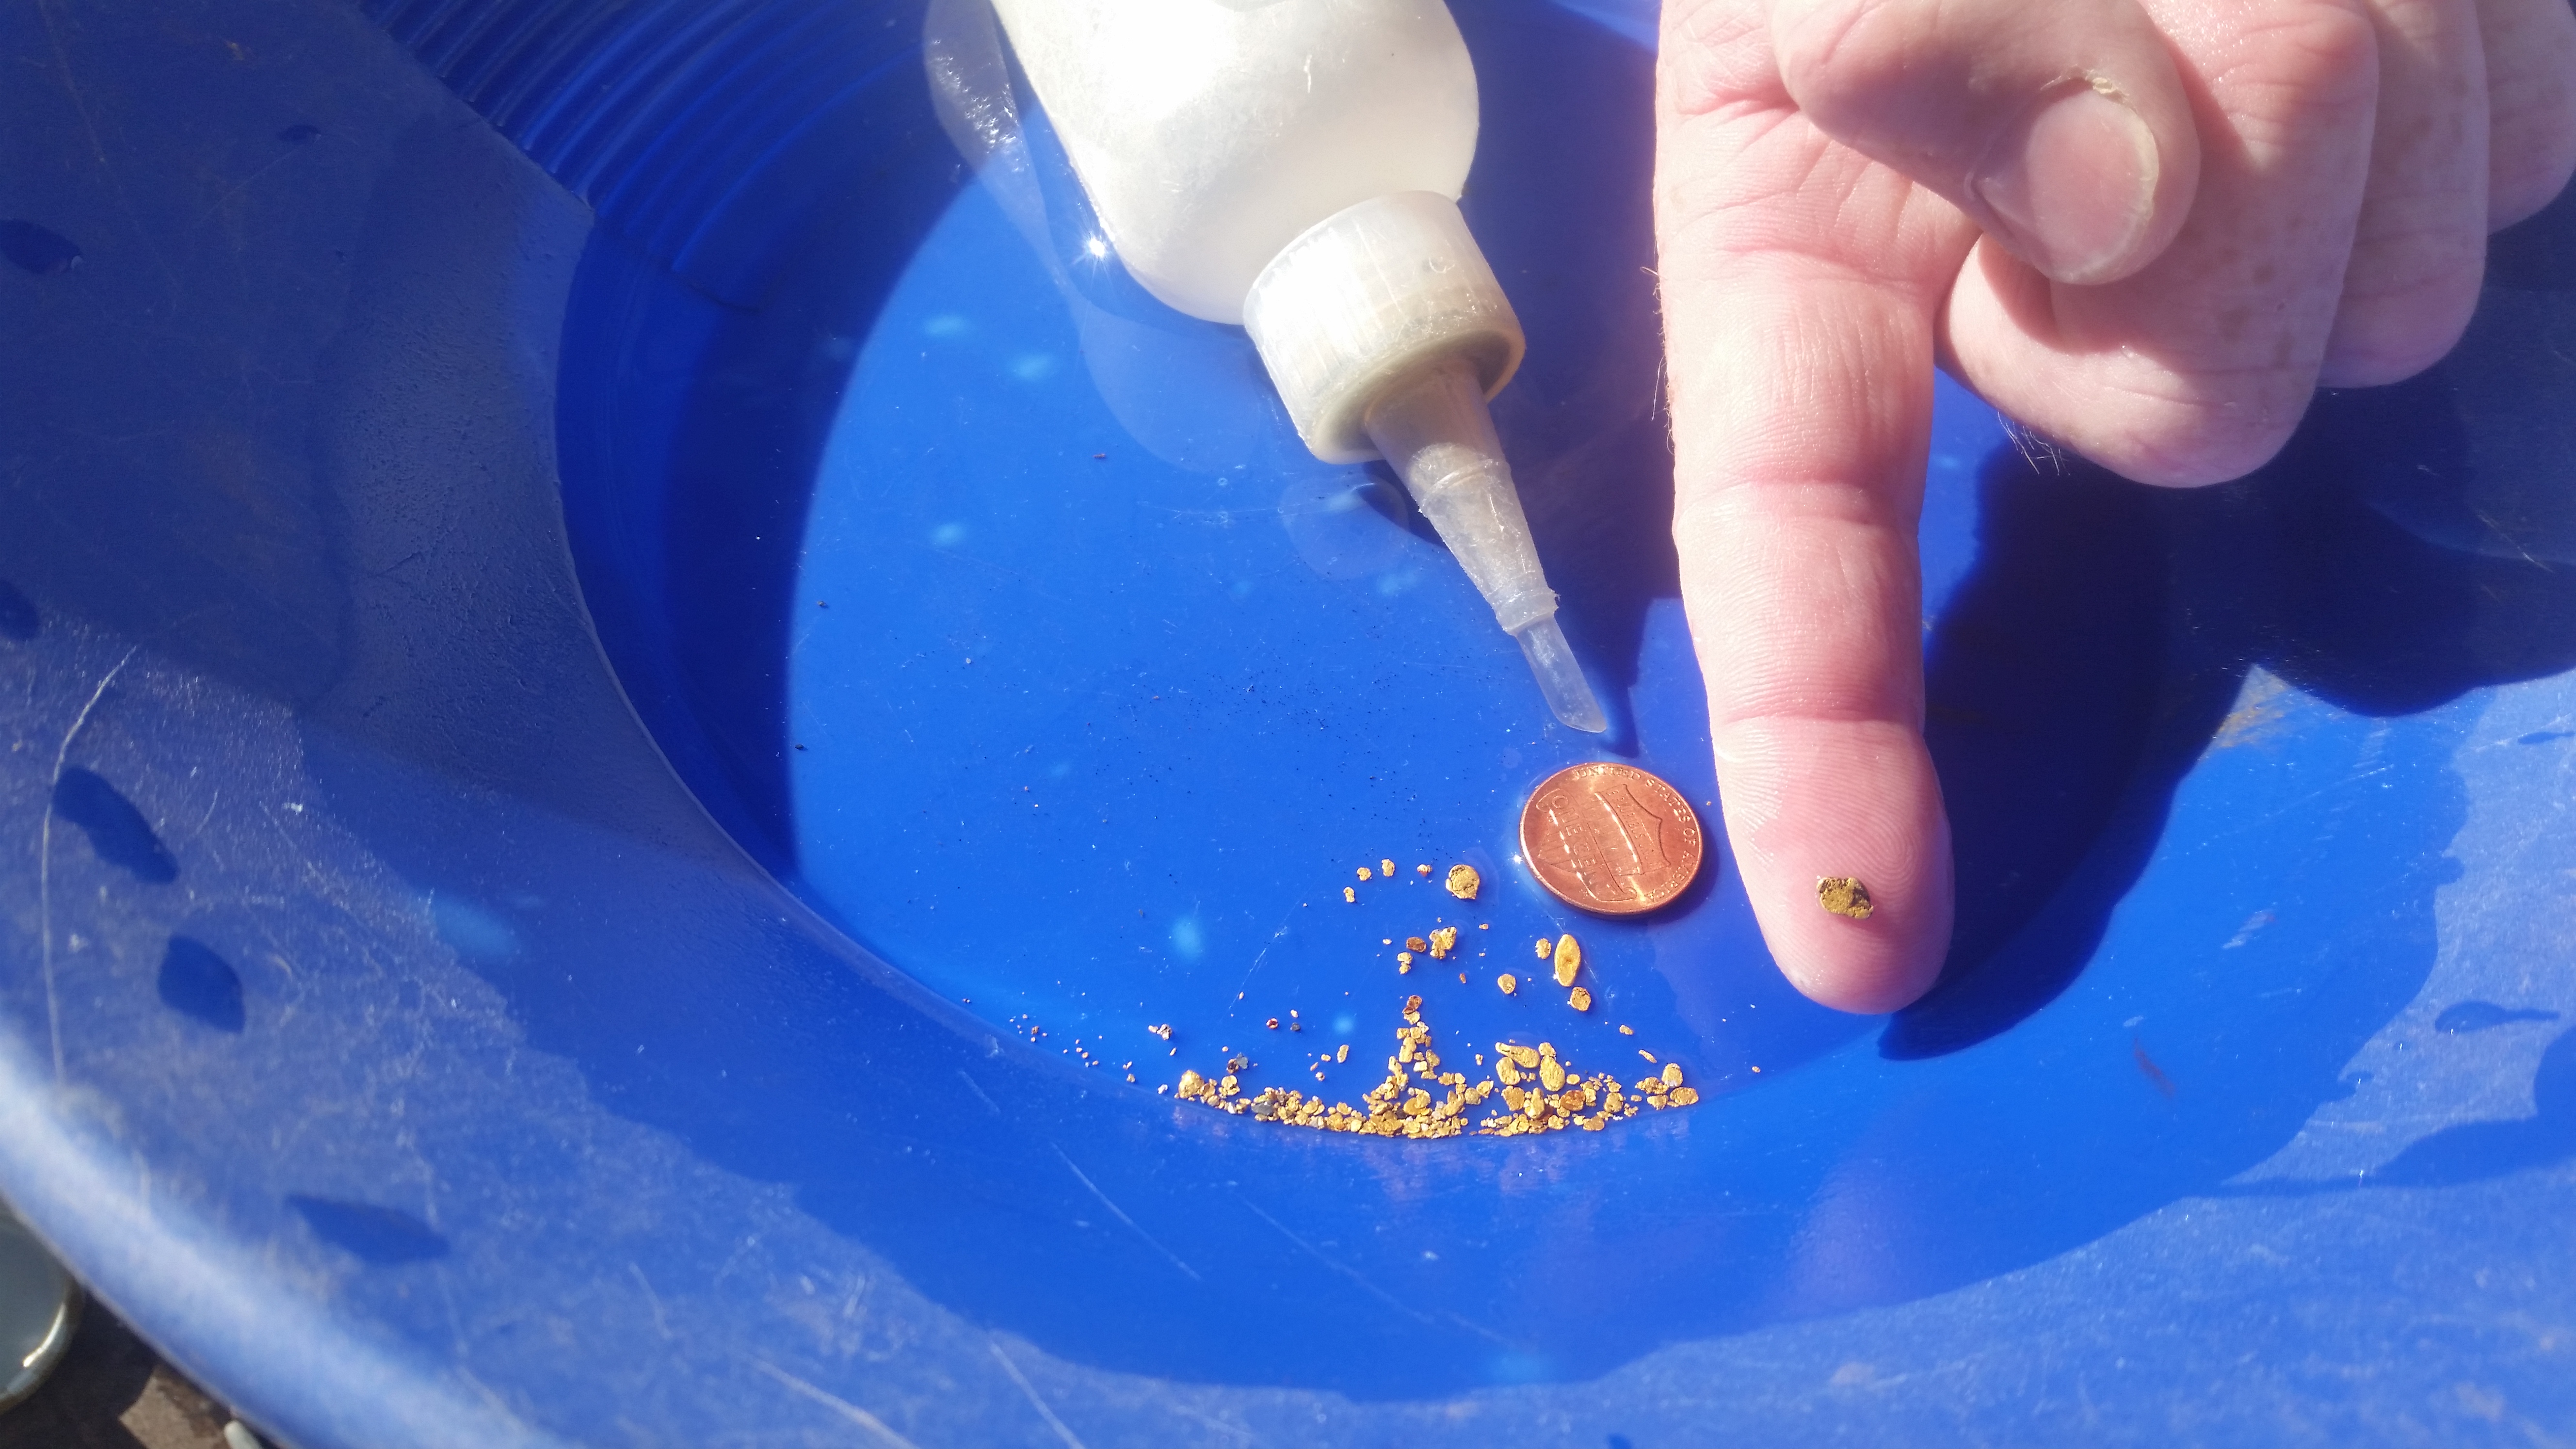
During this trip, I spent three days on the river. I didn’t get rich, but I did find 1.27 grams of gold—much of it coming in as nice big flakes. I also found one thick flake/small nugget that I pulled out with tweezers. This was mining without sweating or straining. I enjoyed my time swimming in the cool river, watching curious fish swim up to see what I was doing and sucking up big flakes of gold. While I was doing this, my wife and children managed to pass the time swimming, skipping rocks and chasing frogs (that would be my 6-year-old). And they loved to come by from time to time and see what I was doing—to see if I had any big flakes to show.
There is still gold to be found in the California rivers by those who are willing to look—and it isn’t that hard or uncomfortable to get. In fact, I can’t think of a better way of spending a hot summer’s day than slowly floating down a cool river while picking up flakes and nuggets of gold.
12/23/14
Sluicing Small Creeks
First Fire, then Flood. . . .
By Alan Chenworth©
Originally printed in the GPAA Gold Prospector Magazine, spring 2014
There are typically three natural events that have a hand in moving gold—and they are all catastrophic to the environment. Earthquakes are the first. They are capable of causing widespread destruction such as landslides as well as change the course of both streams and groundwater, which can move the gold down to stream channels where it can be naturally concentrated. The good shaking that earthquakes give will also help to “settle” gold, helping it work its way down to bedrock, or if it is already there, pushing it deep down into cracks and crevices. This article will focus less on earthquakes and more on the relationship between the other two—fire and flood.
As previously mentioned, forest fires are the second method of moving gold. Fire is a little more indirect, working in conjunction with the third way, flooding. A careless lightning strike, a pile of organic matter, or even a well timed rockslide can cause a fire. If this fire gets out hand, it can be devastating. Abundant deadfall and thick undergrowth (as well as diseased old growth forests) burn especially well, and are found in many of the poorly managed forests that abound in the western U.S. today. When these fires get going, they will devour everything, killing all the trees, shrubs and other vegetation. It is this vegetation that typically holds the soil in place and encourages the water to slowly soak into the ground. Without this vegetation to hold the soils in place, it breaks up and slides down the hill. Erosion can increase exponentially.
Then there are floods. A good snow pack will lead to the typical spring run-off, which is a yearly flood. The typical yearly flood will not move much gold—maybe some small fines or flakes that are typically referred to as flood gold. However, abnormally high snow packs or warm temperatures may lead to excessive run-off and 100 or 500 year floods. These floods can last for weeks and are able to move a lot of gold. Abundant rainfall can also create flash floods, as water comes down faster than the ground can soak it up. While typically short lived (usually a few hours), these floods can also be in the size range of 100 or 500 year flood events. These 100 and 500 year floods are the floods that can scour the river channel to bedrock, and will move the gold.

As it scours, it will pick-up the fine gold and carry it downstream to a low pressure area where it falls out of suspension and creates a pocket or pay-streak. The big gold is likely still too heavy for the water to pick it up, so it will push and tumble it along the bottom of the stream channel, where it will also stop in lower pressure area. These lower pressure areas are generally not the same ones that deposit the fines and flakes, but instead form in the same deposits that catch boulders. (This is why you don’t often find fine gold in the same places where you find nuggets). Low pressure pockets can also form behind the boulders and above the nuggets.
Very often, due to the lack of vegetation, floods will follow forest fires. This is especially true of flash floods. A good example of both the forest fire and flood was seen this summer at Little Sevier Creek in Sevier County Utah, where there is a gold deposit on a large alluvial fan. Here, there is (or was) heavy timber and undergrowth on deep soils. This soil was underlain by a thick (3-10 ft) layer of sticky clay with clasts of rock in it. Under the clay was hard-healed, silicified breccia (a breccias is a rock made up angular rock fragments that have been cemented together—with quartz in this case). Gold in the area tends to be both on top of, as well as through out, the clay layer.

In the early fall of 2010, the Tushar Mountains of south-central Utah were hit with a massive wildfire. This was a very large, hot and long-lived fire that turned a beautiful, timber covered range with peaks above the timber line into a desolate charcoal black landscape. This fire was followed by a cool, wet winter with an above average snowpack (200+% of normal). As was expected, there was very high, flood stage water during spring runoff—but the damage was not yet complete.
A friend and I went down to Little Sevier Creek in August of 2011 to check the area out. We wanted to see how much material had moved, and how much bedrock was exposed. Much to my surprise, upon arriving, we found that there had been a cloudburst, probably the day before, and that there had been a large flash flood in the canyon. Roads had been washed out, small dams had blown out, and underground mines had been filled with sediment. Many of the areas lower in the canyon had been filled with sediment; in other places, stream channels had been scoured to bedrock. The floods had done a lot of work in the district.
Prospectors and miners can benefit by this flooding in several ways. First, anywhere the creek has scoured to bedrock, it has opened up new bedrock to work. Gold will generally migrate over time to bedrock, but if there is too much overburden, working the bedrock is not a possibility. This is especially true with the small miner. If you need to move more than two or three feet of overburden by hand, you will not be able to effectively mine the bedrock. A good flood can open up new prospecting areas by clearing (or nearly clearing) large sections of creek.
// ]]>
Second, the stream is concentrating the gold for you. Gold is about 9 times heavier that the surrounding sediment, so it will tend to remain behind (or at least not move as far) while the rest of the sediments is washed away. A low grade deposit, one with only a little gold spread through a lot of overburden often cannot be worked. But give it a good flood, and all that gold can be concentrated in a few tens of yards of newly enriched material; you now have a mineable deposit or pocket.
Third, new pay-streaks are created. As the flood continues to push material down the stream channel and gold is moved with it, it allows for gold to fall out in low pressure areas making new pockets and pay streaks. These are often found behind logs or bounders, around the inside bend of a river or creek, or anywhere the river widens out (and consequently slows down). Small creeks (such as Little Sevier Creek) are less likely to form these low pressure deposits due to a steeper gradient and less consistent stream flow. I say “less” likely because while big rivers tend to form more and better (larger and richer) low pressure deposits, they are still present on the smaller creeks.
My friend and I were amazed at the amount of damage done on Little Sevier Creek by (first) the forest fire, then (second) the several floods that followed. We were also impressed by the new prospecting areas that opened up and the new possibilities for us to find gold. We were only able to stay a few hours— but then it only took a few hours to find several grams of nice chunky gold from the newly exposed bedrock of the area. Forest fires and floods can be a big bonus to prospectors.
Alan Chenworth is an author and avid prospector based in Utah, where he works as a geologist in the mining industry. His website is www.goldpanningutah.com. His book, “A Guide to Gold Panning in Utah”, is available online.
Sept. 2, 2014
The Silver Islet Mountains of Utah©2013
By Alan J. Chenworth
Originally Published in the International California Mining Journal in January 2014
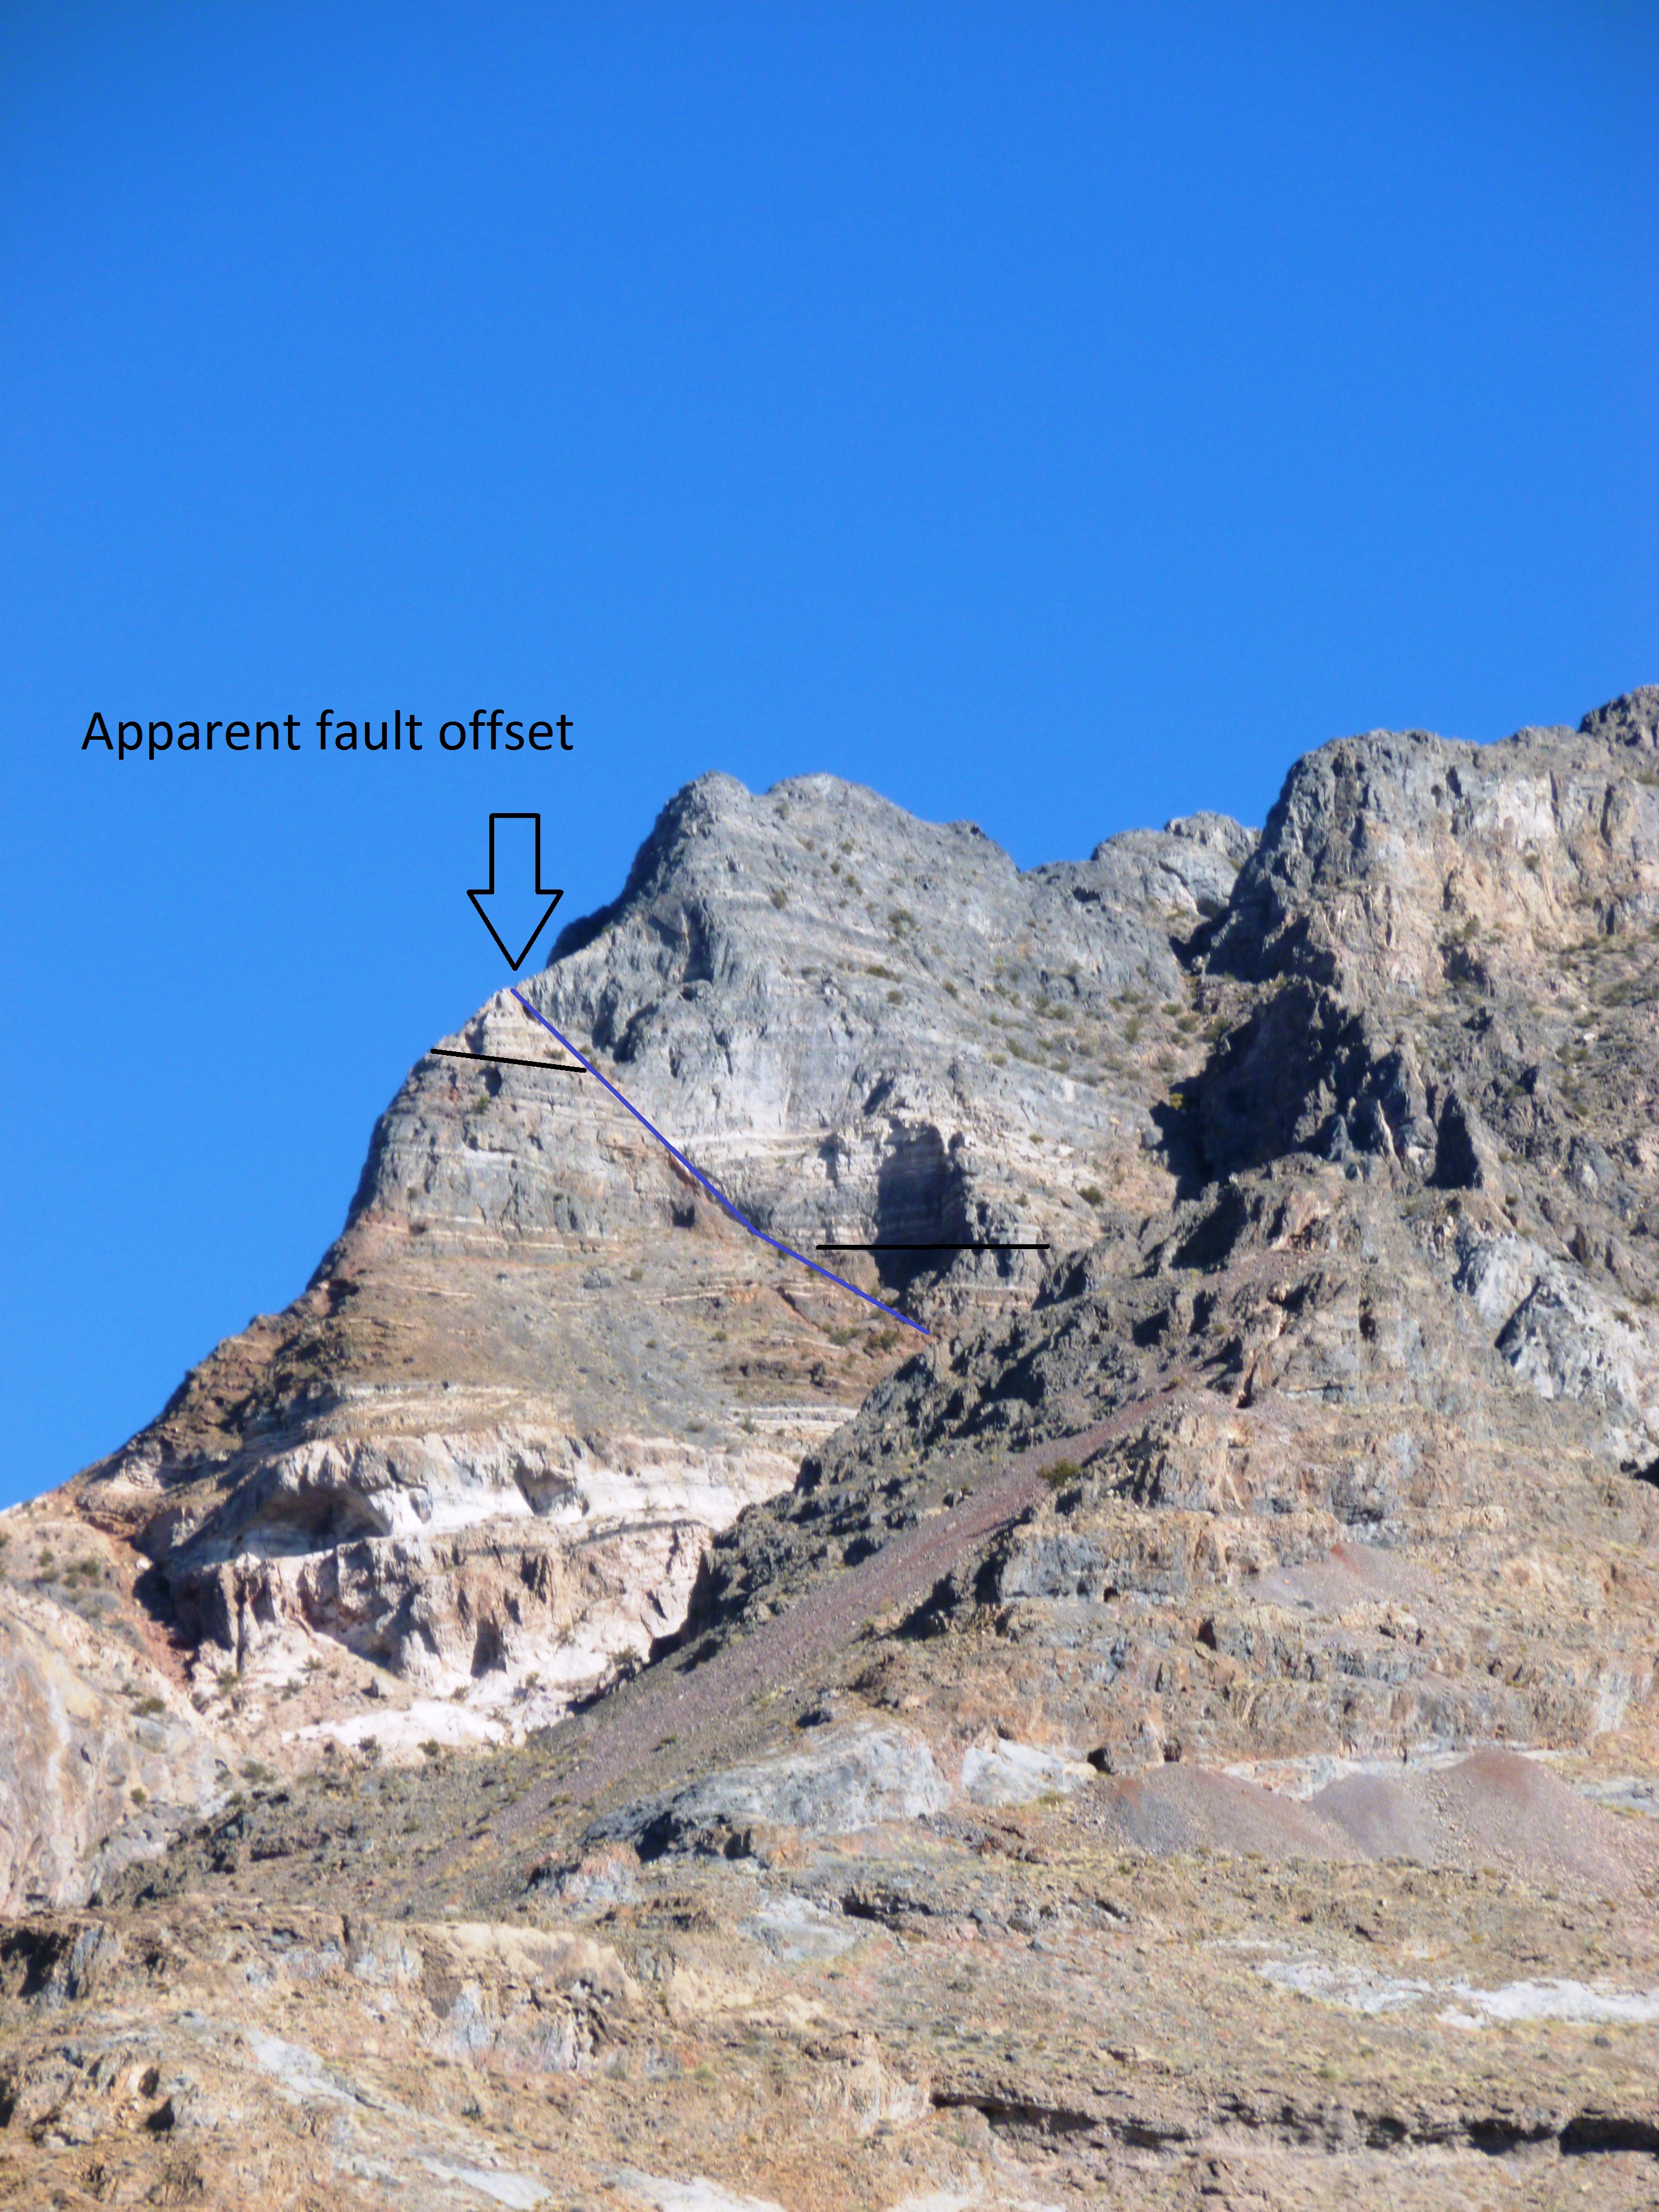
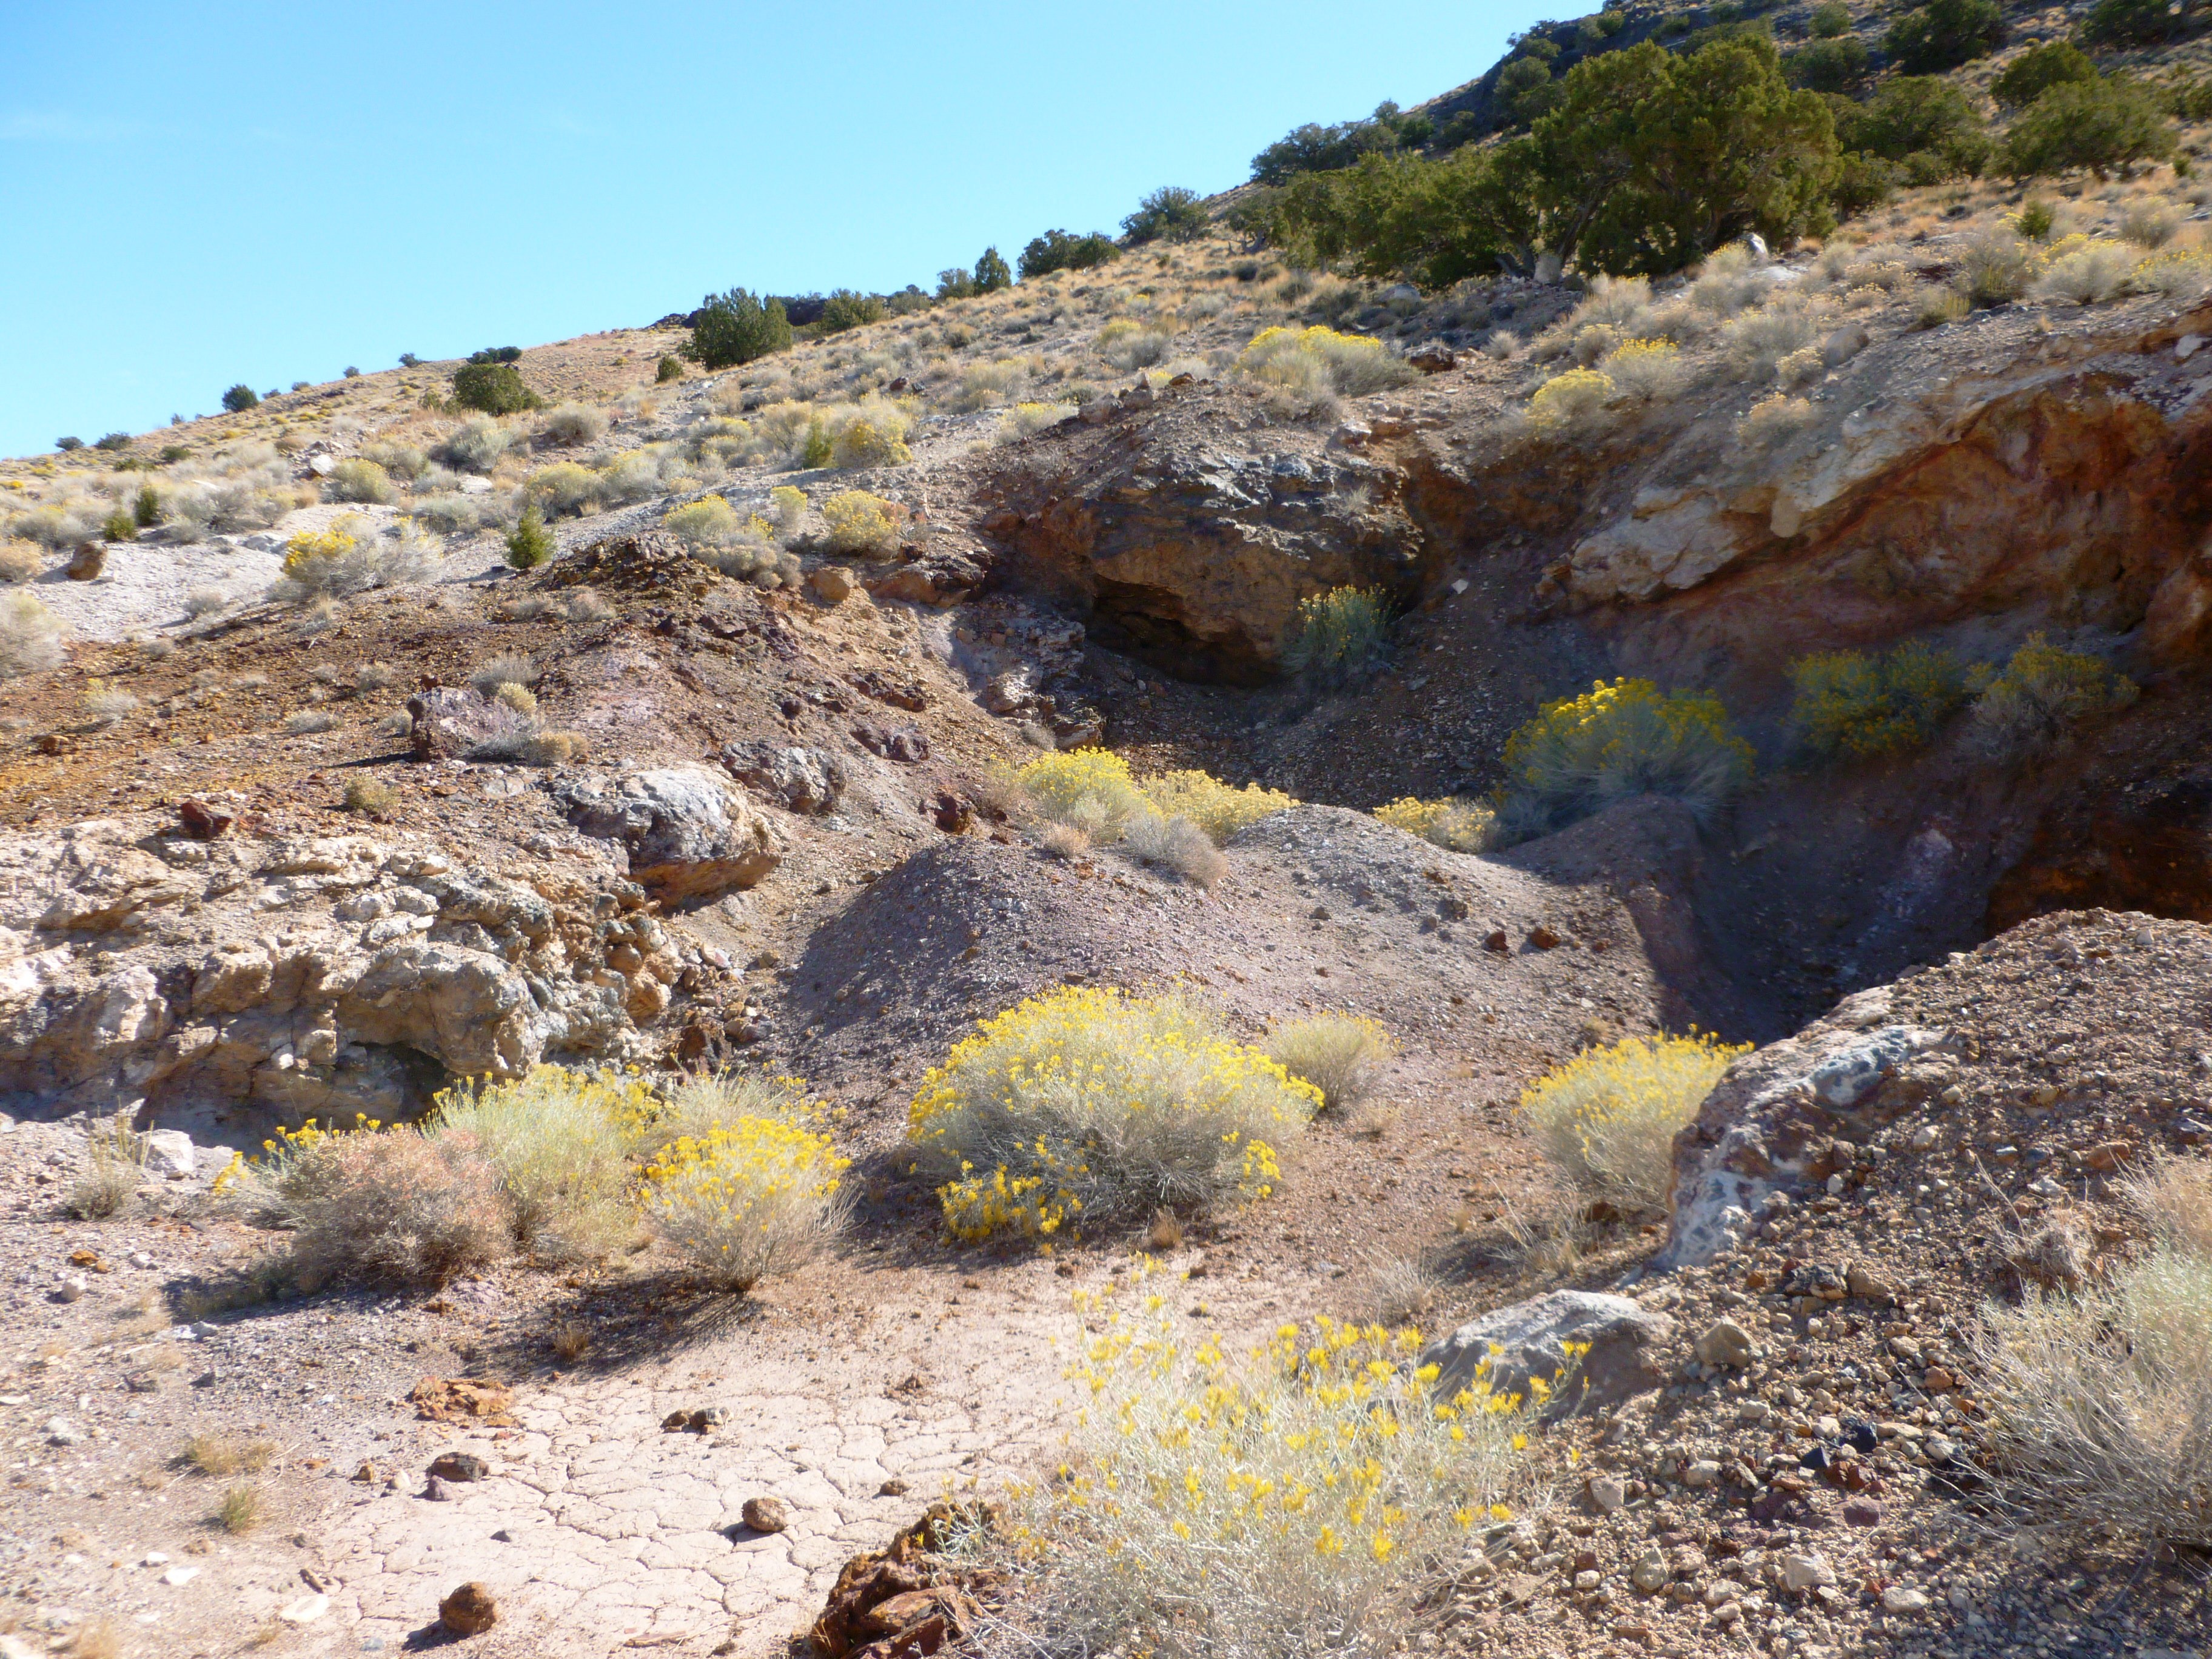
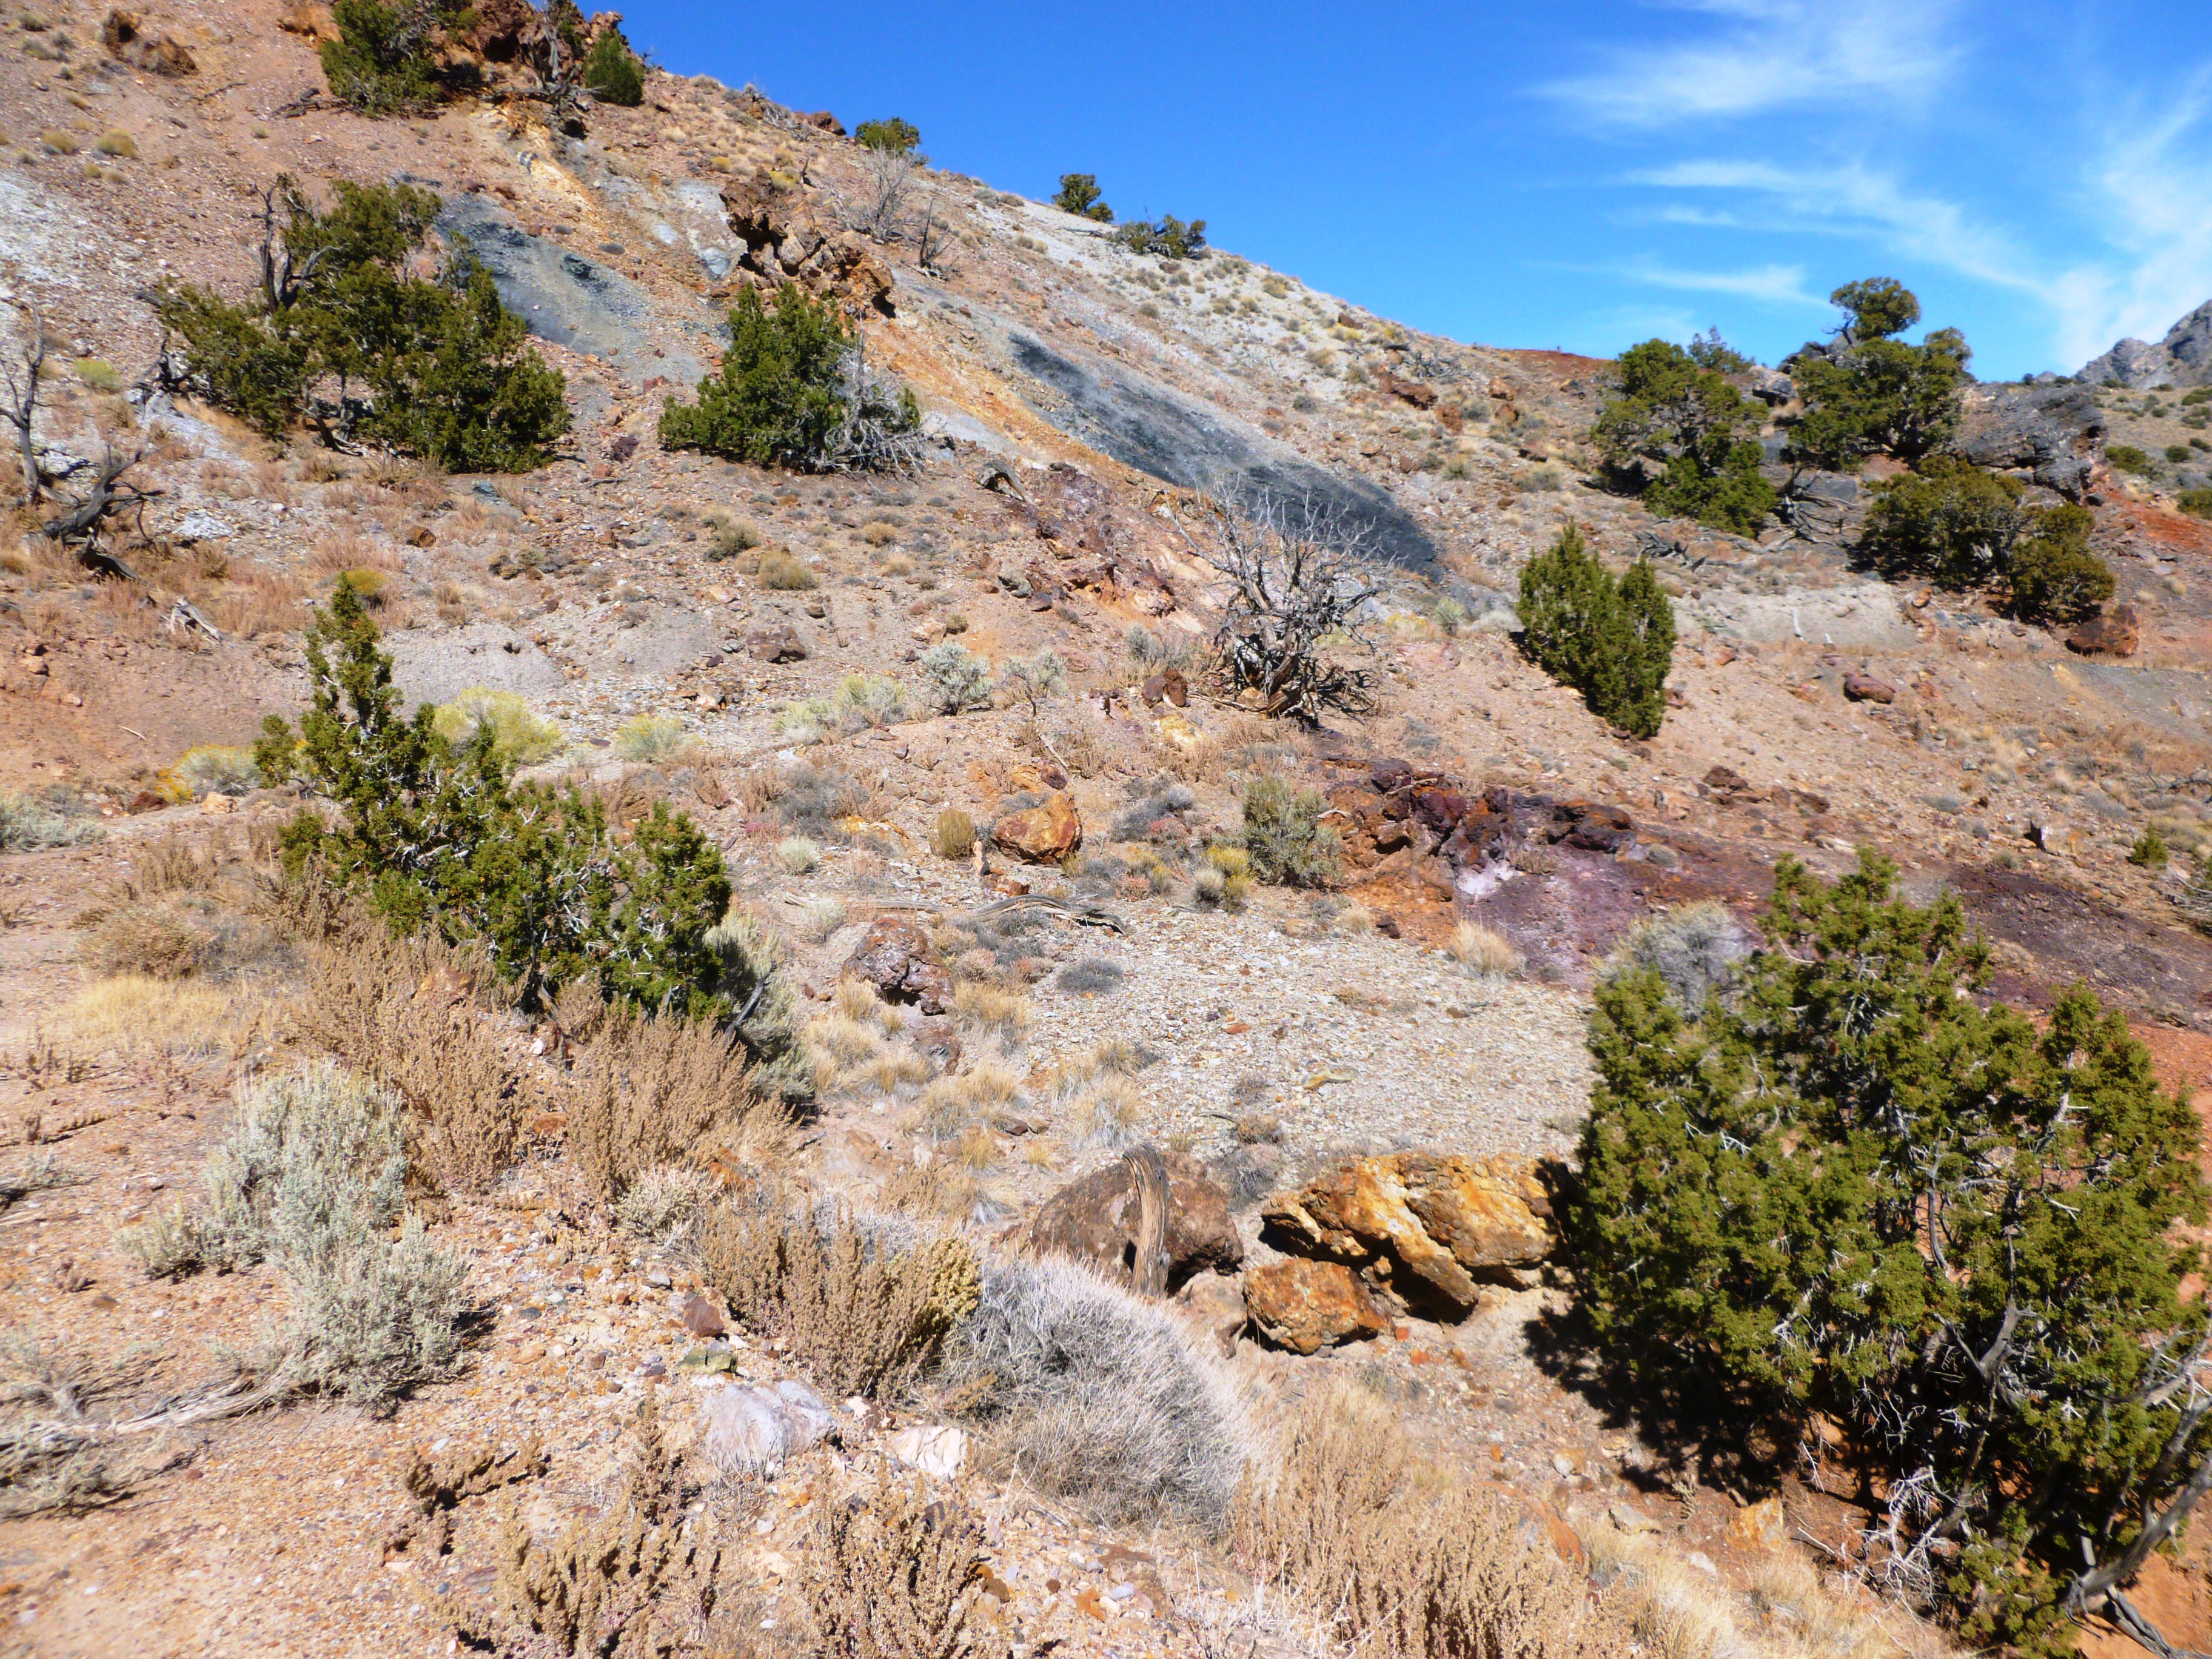
The Silver Islet mountains sit out on the Salt Flats north east of Wendover, and just to the north of the Speed Week race track. The range is relatively large, averaging about 38 miles in length and 8 miles at its widest. The range trends to the north west. The Silver Islet range is composed of several large blocks of limestone that have been pushed up to about 7300 feet in elevation and is made of three main “islands”, including Crater Island on the north, Silver Island in the middle and a smaller, un-named island-mountain to the south that is home to Tezlaff and Rishel Peaks. Aside from some scattered juniper and sage, none of these mountains have much vegetation, though the range is strikingly beautiful. As with most of the mountains in the Basin and Range Province, the Silver Islet range is bounded by large normal faults where the valleys drop during extension of the underlying plate. Large, east-west normal faults with several hundred feet of offset are also present and are visible from the road (see photo).
Access to the range is good. It is a 15-20 minute drive from Wendover, and there is a nice, well graded dirt road that runs all the way around the range. Small ungraded dirt roads will periodically leave the main road to access points of interest in the Silver Islet Mountains.
As I had never been to this range before, and knew little about the area, I focused my attention on some mines and prospects in Silver Island Canyon, which is found on the the north east part of Silver Island Mountain. The map listed the road as a jeep trial, but I navigated it just fine in my 2wd truck (and incidentally, I did see a Subaru car parked on the side of the road about half way through the canyon).
The area was completely deserted and, aside from the empty Subaru, I never saw another vehicle the entire time I was in the range. It is truly a solitary place.
The Silver Islet mountains have been a historical producer of lead-silver ore. According to Butler (1920), in the book Ore Deposits of Utah, the first mineral in the range was discovered by a sheepherder named McKeller—and the Silver Islet mining district was organized in 1872. (A conflicting report by GRE identifies the White Star mine as being located in 1864 with the discovery of a high grade outcrop of silver ore), and mentions that it was still in production in 1917. Total production for the district was reported at $809 in gold, 110,614 ounces of silver, 57,353 pounds of copper and about 414,339 pounds of lead—with a total value of $90,219 by 1920. While the production has been relatively small, the lead silver veins were of a comparably high grade. There is no record of production past 1920, though evidence (garbage and mining relics) suggests that there has been fairly recent mining in the area (past 1960). Gold Rush Expeditions (GRE) also details mining through World War II and some active claim staking through 1956.
As placer gold is not uncommon in other silver lead districts—and there was some gold recovered with these silver mines—I brought my dry-washer along in the hope that this area would also have some placer gold associated with the veins, or possibly from a small gold skarn deposit.
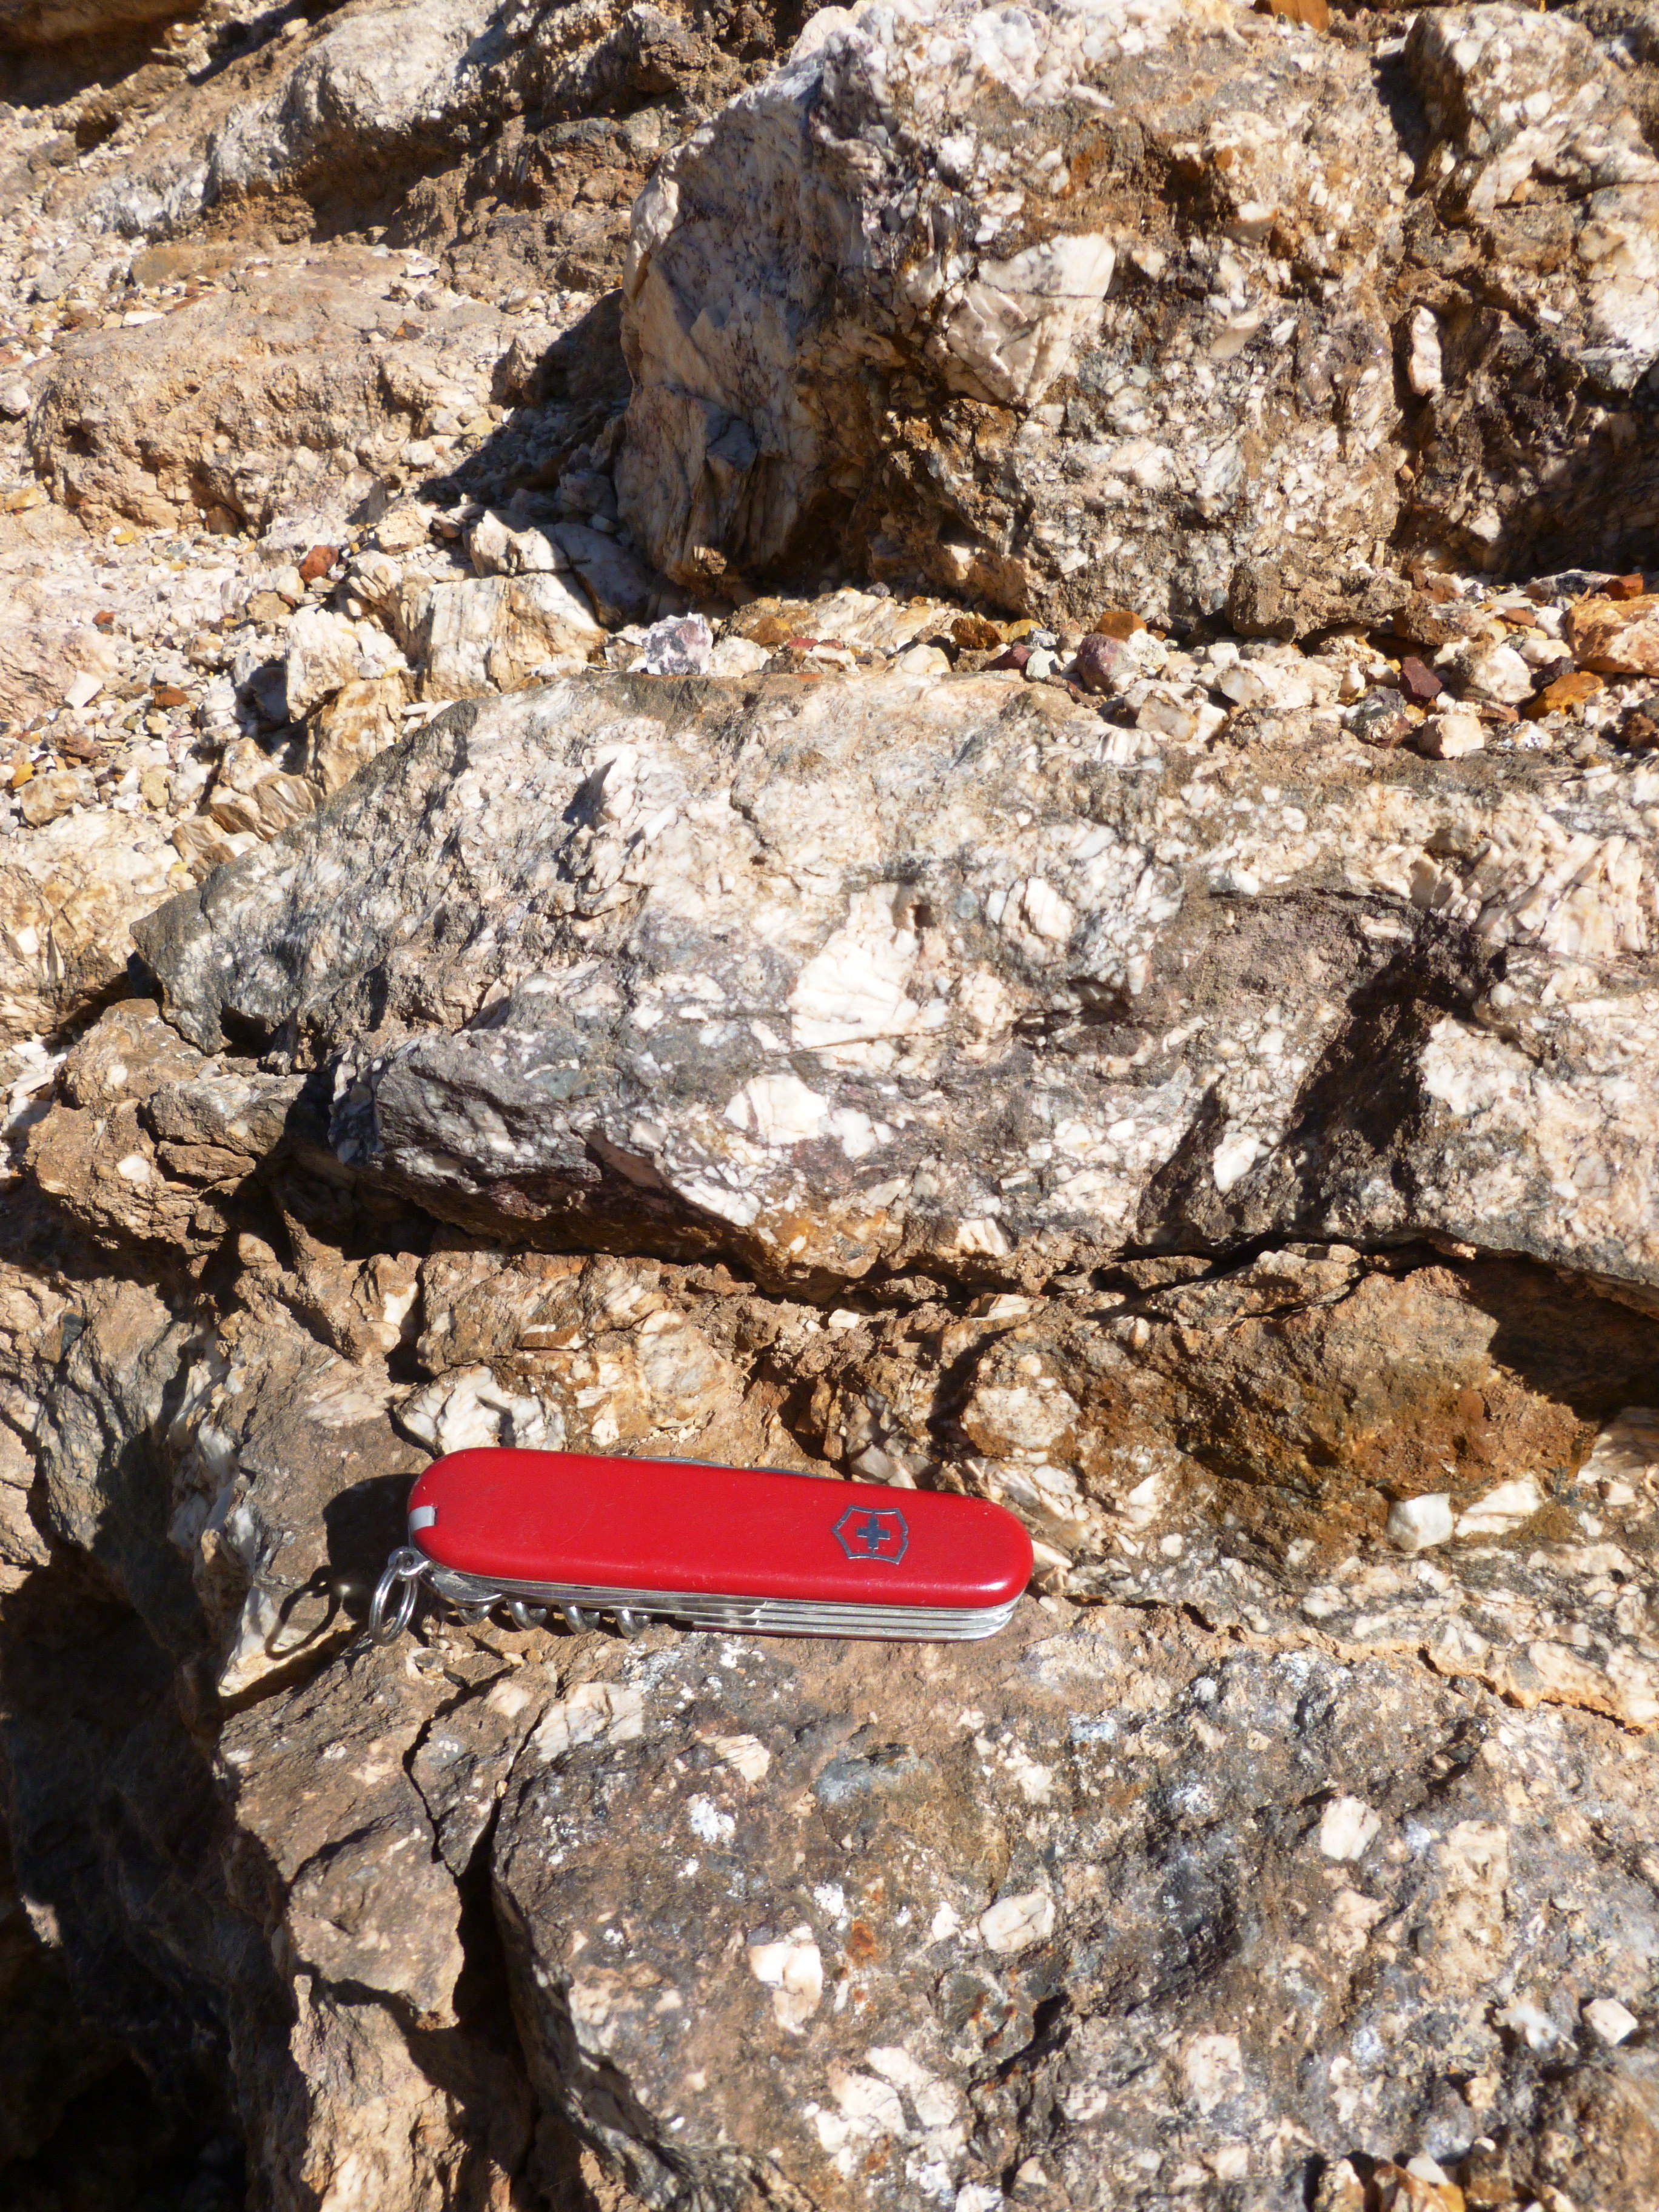
The first place I stopped in Silver Island Canyon was an old prospect on the west side of Cobb Peak. It was a small cut into the side of the hill where there was an iron stained outcropping. It appeared that this area was what is often called a silicified “reef”. This is where hot, acidic fluids interact with a limestone–often along faults—and dissolve the limestone country rock, replacing it with quartz, along with various minerals. In this case iron (probably originally in the form of pyrite) was one of the minerals left with the silica (quartz). The pyrite has since oxidized, giving the rusty appearance seen in the outcrop.
I set up my dry washer on the north side of the cut and sampled the bedrock and dumps around me. As I was only sampling, I ran for 20-30 minutes, shoveling from a variety of areas. When I cleaned up, I didn’t find any gold (at least not visible gold), and had only a little black sand, so I packed up and headed north.
After only a few miles I came over a ridge and started down toward the salt flats again, I came upon another mine workings. This one was much larger and appeared to be more than a prospect. They had put some time into this mine and had worked several benches—then came back in and reclaimed the area. Old fuel drums, equipment parts and some reclamation suggest that this mine was worked more recently. Like the previous stop, the limestone here had been replaced with quartz/silica and had created a hard, rusty red quartz breccia (a breccia is broken up rock that is re-cemented together). The canyon below the mine was heavy with sediment and did not have any accessible bedrock, but after another dry-washer run, I didn’t find any visible gold in the alluvial (stream deposited) sediments here either.
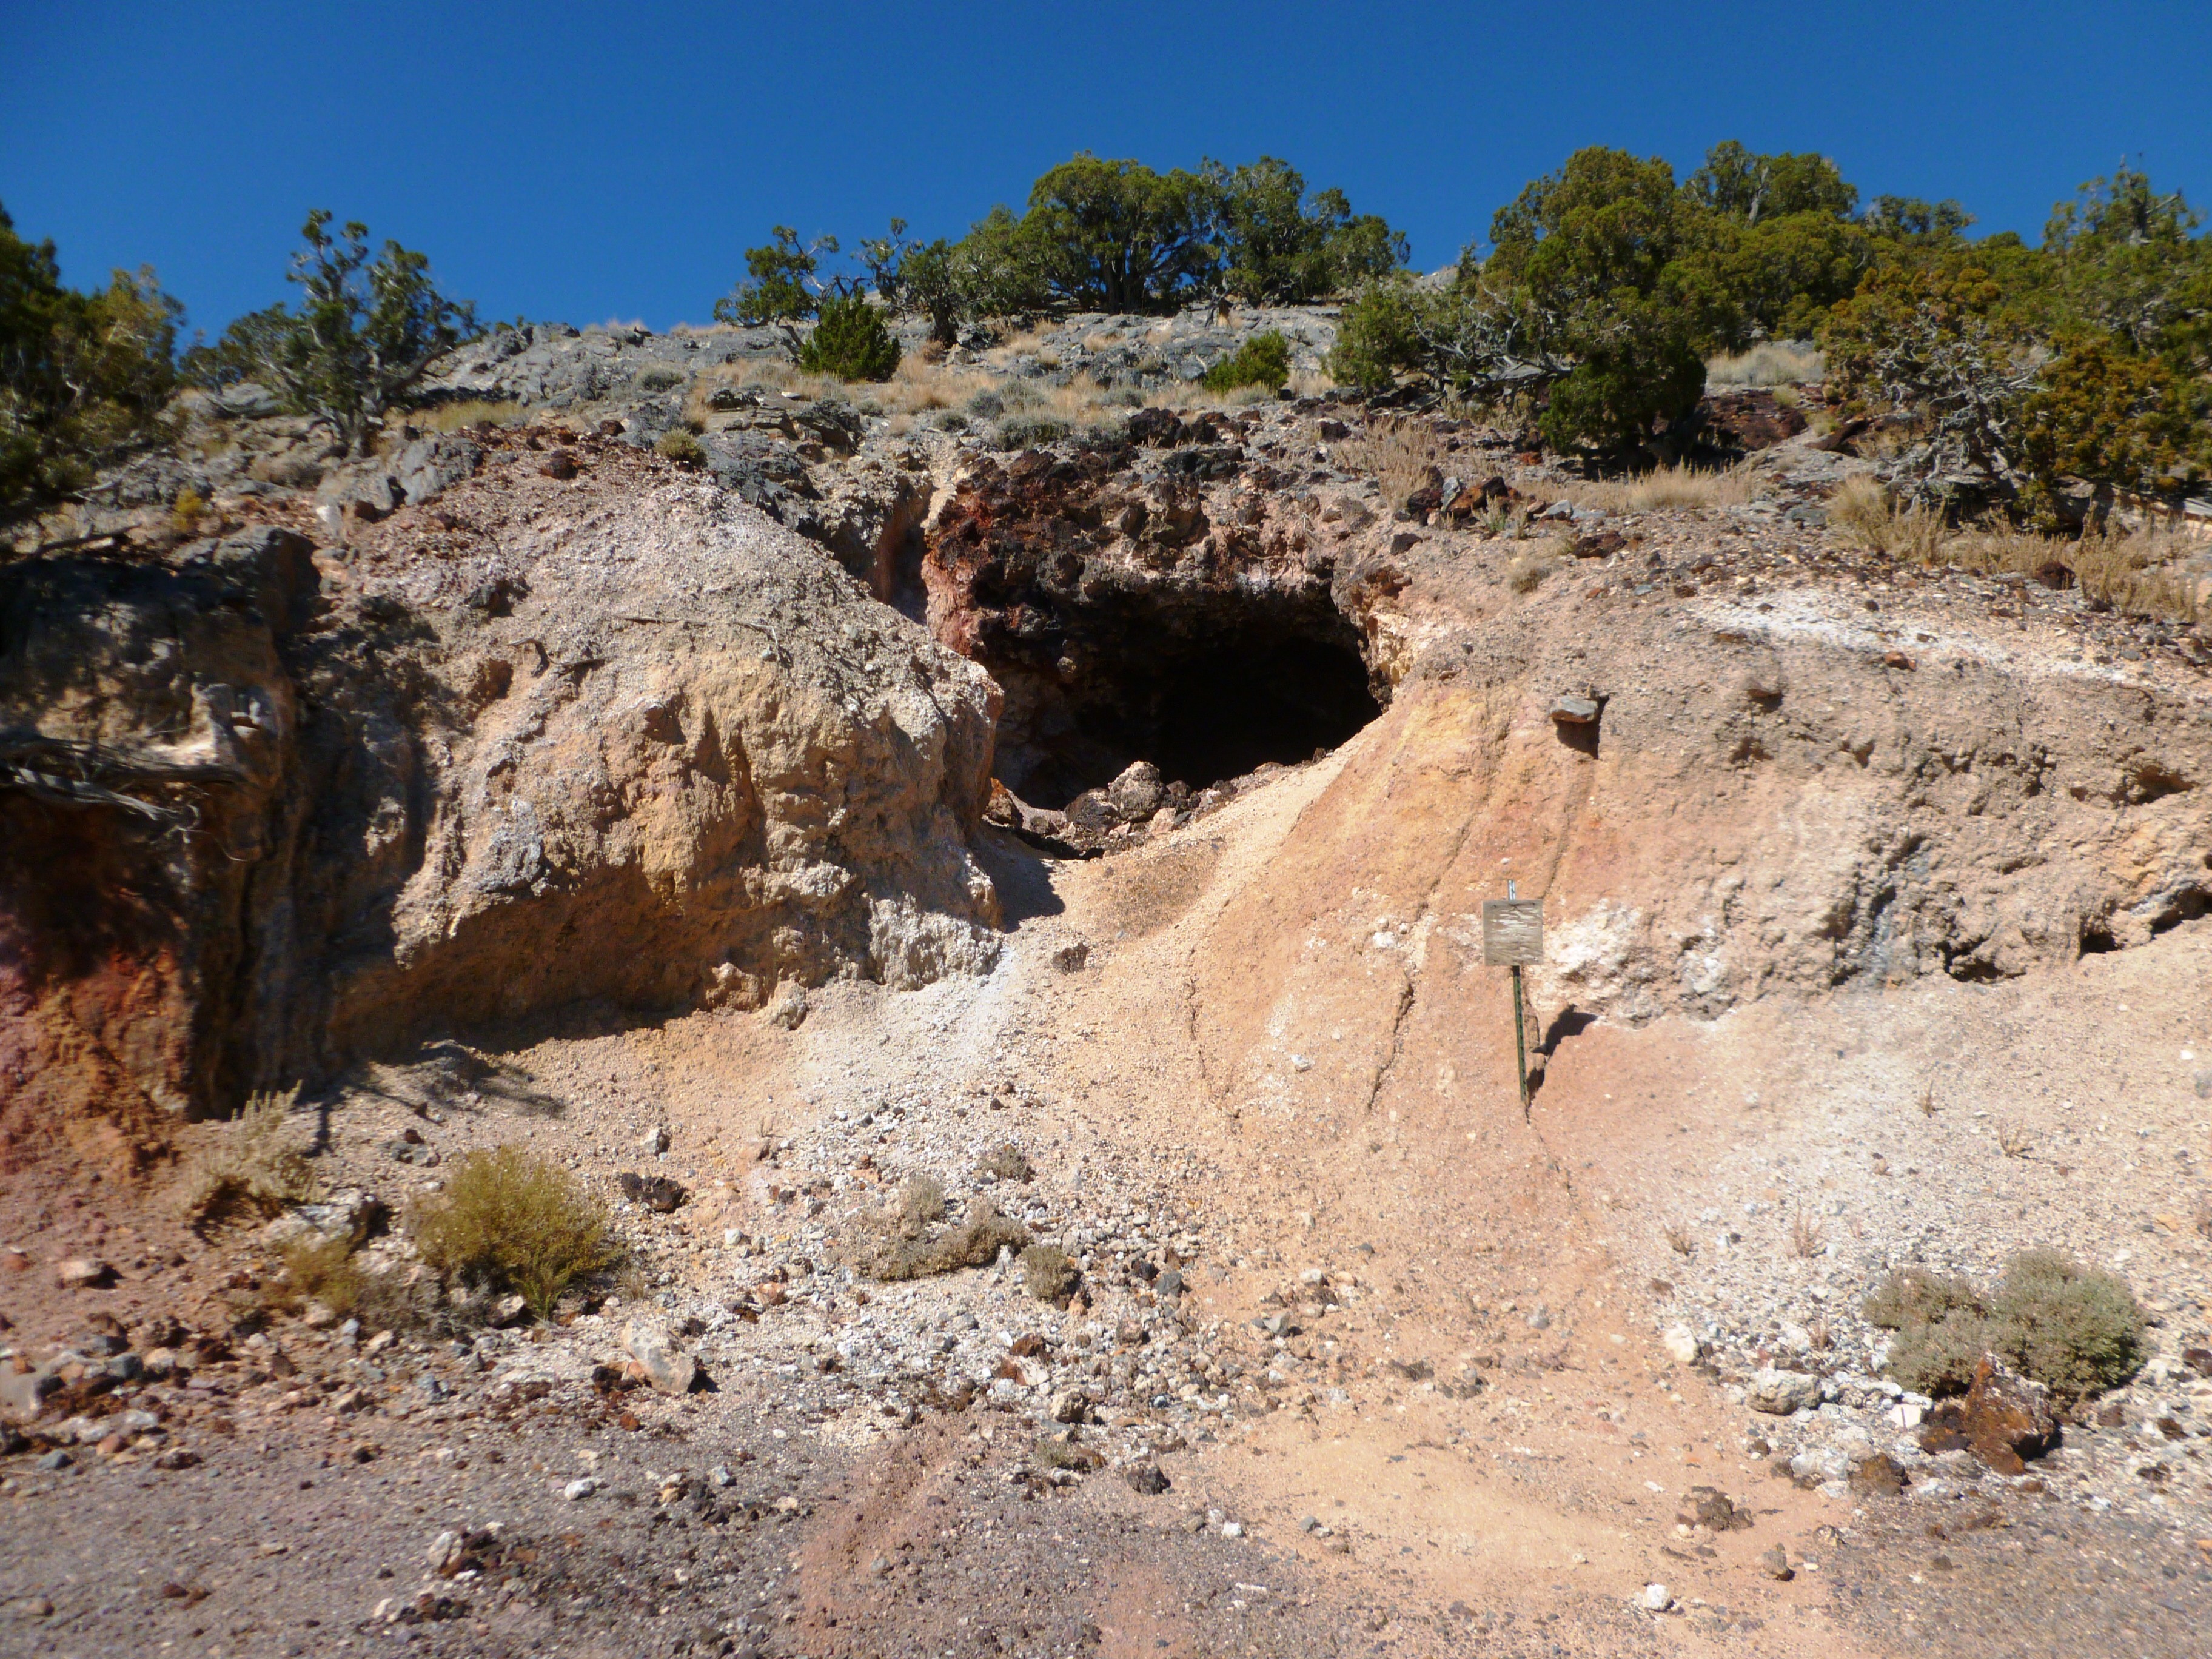
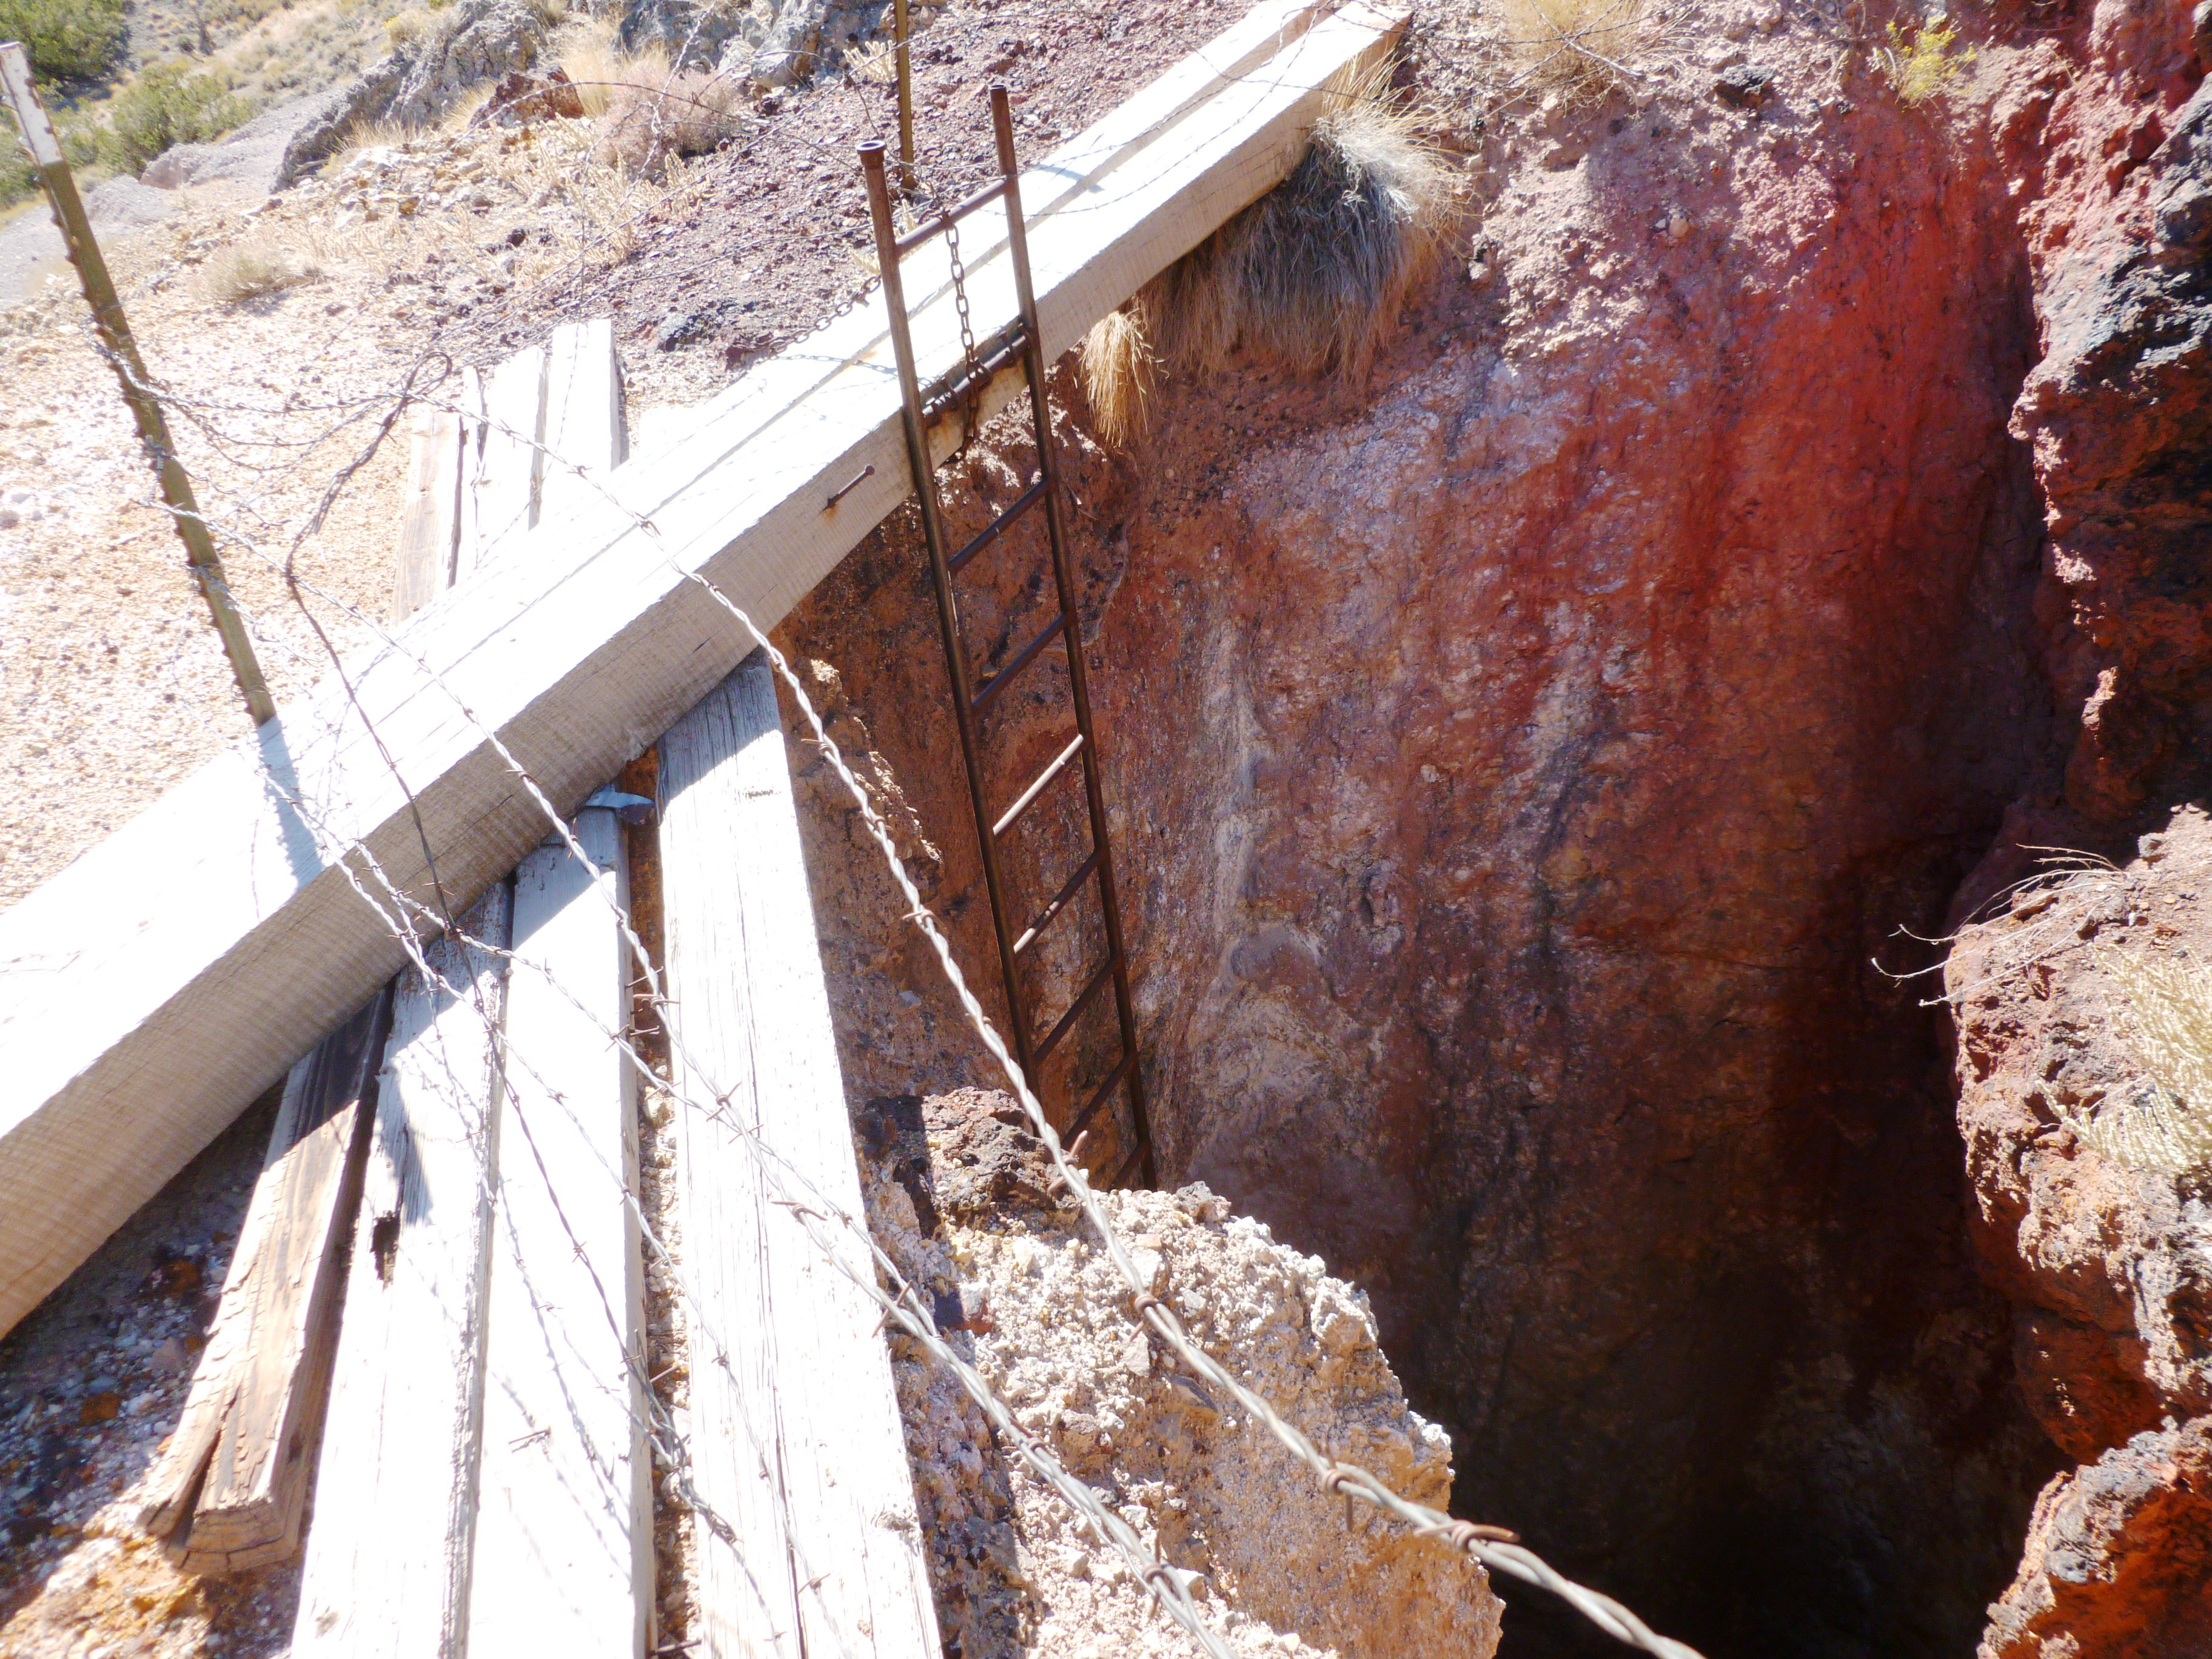
By the time I finished here, it was well past noon, and I figured I had time for one more stop. Turning back to the south, I went over the ridge and down the canyon. About half way back to the main road, the trail I was on had a fork that turned to the north. I followed this road to its end where I found another collection of old mines, including a small adit and a shaft that I estimate to be 60-80 feet deep. The head frame to the shaft was gone, but there were a number of heavy timbers crossing the top of the shaft and an old steel ladder made from welded rebar that descended into the darkness. The rocks surrounding these mines, as well as in the dumps, were stained rusty red from iron oxide—and the blue/turquoise of copper staining was also apparent. A short walk down the canyon to the south brought me to some exposed bedrock, so I filled a 5 gallon bucket with material from off the bedrock and carried it back to the truck. After filling a tub with water, I panned down the material and found a few specs of fine flour gold in three of the test pans. Things were starting to look up! The presence of gold in the test pans meant that it might be worth my time to carry my dry-washer down the canyon to see if I could find more gold (or better gold) in the area.
It took about half an hour to pack the dry washer down the canyon and set up, but since I was on both shallow and exposed bedrock, I figured I would have a good chance at finding some gold. I worked for about 30-45 minutes, moving some rocks and boulders, cleaning about 10 square feet of bedrock and cleaning out some bedrock cracks. Then I cleaned out the dry washer and hiked back up to the truck to pan it down.
I panned it down slowly and carefully. It took me about 20 minutes to pan the material and check it for gold. After finding gold in the original test pans, I was surprised that there was no gold here in the dry-washed material. I even used a hand lense to look for the fine flour gold, and didn’t find any.
I went back and vacuumed up the bedrock because it was very rough—maybe the gold was right on the rock—but my luck was the same. There was only one tiny spec that was barely visible and it was stuck in a scratch in the bottom of my pan. Since I already had the dry washer down in the gulch, I thought I should give it another try. I moved it up to the same place where I dug the original sample with gold in it and did anther short run. Again, no gold. After two hours of dry-washing, I hadn’t found more than a single spec of gold.
While taking a short break, I looked down the canyon toward the Salt Flats as I leaning against my truck. I was appreciating the view in the cool evening air, while I pondered how I could get gold in the small sample that I test panned, but not the larger bulk run with the dry-washer. I quickly narrowed it down to three possibilities:
1: I got all of the gold the area had to offer in my test pan (not likely);
2: My dry washer was not capable of capturing the flour gold found here (possible, but not likely as I have found gold like this before);
3: My pan, bucket or vacuum was contaminated with gold from another area (very likely since the weekend before I had found gold that looked just like it with the same pan that I carried in the same panning bag—and had recently used the bucket to carry dirt from another similar deposit).
It didn’t take long to realize that I may have had a false positive in my test pans because I didn’t properly clean my equipment. The pan had been rinsed out and the dry-washer cleaned, and I had used them to sample the material at the last two Silver Island prospects—but the bucket had not been cleaned. Before I filled it with the test material, I had tipped it upside down to dump out any material that was still hanging around in the bucket, beat on it a few times to dislodge any mud or sand that was stuck to the inside, then filled it part-way with sand and swirled it around to dislodge any gold bearing material that may be stuck there and dumping it out again to clean the bucket. I did this twice before I filled the bucket with the material that I sampled, but I had not taken the time to actually wash it out. There is a chance that the gold I found may have been from this wash, but I believe it was from another gold bearing area hundreds of miles away as a result of contaminated samples.
Even though I did not find any placer gold in the Silver Islet mountains, I will be going back there to do more prospecting. I only sampled one small corner of the range, and there are a number of other mines in other parts of the range, both to the west and south, and some of these areas have a higher concentration of mines and longer mining history than the area I visited. Because of the $809 dollars of gold that was recovered (at $20/oz), I know that there is some gold there—even if it has only been found in trace amounts. Also, limestone is known to have an affinity for gold—and gold in limestone tends to be microscopic in size, such as the Carlin style deposits found in Nevada, that don’t generally have gold that is visible to the naked eye.
While I was exploring the range, I found marble, strong iron oxides, copper oxide staining and silicified reefs. Furthermore, Butler (in The Ore Deposits of Utah) reported diorite and other igneous dikes cutting through the area. Taken together, all of these things are indicative of a potential mineral deposit.There is geology here that is favorable for Carling style mineralization, and the area would be a great place for gold exploration by a mining company with the resources to put in a drill and take some down-hole samples, or maybe do a gravity or magnetic survey. Given the amount of copper that has been found in the areas mines, there is also the chance for a deeply buried copper porphyry deposit. The range has been little explored and prospected, and may yet offer a potential bonanza for the prospector willing to put in the leg work.In respect to mineral exploration and claim staking, much of the range remains open, though there are some active claims in the area. These claims are generally small and located around the old mines and prospects. Please respect posted claims.
References
Butler, B.S., The Ore Deposits of Utah, 1920, USGS Prof. Paper 111, p. 486-488.
Gold Rush Expeditions
http://www.nationalbureauofmines.org/photos/utah/tooele/silver-island-mines/
6/03/14 (Reposted)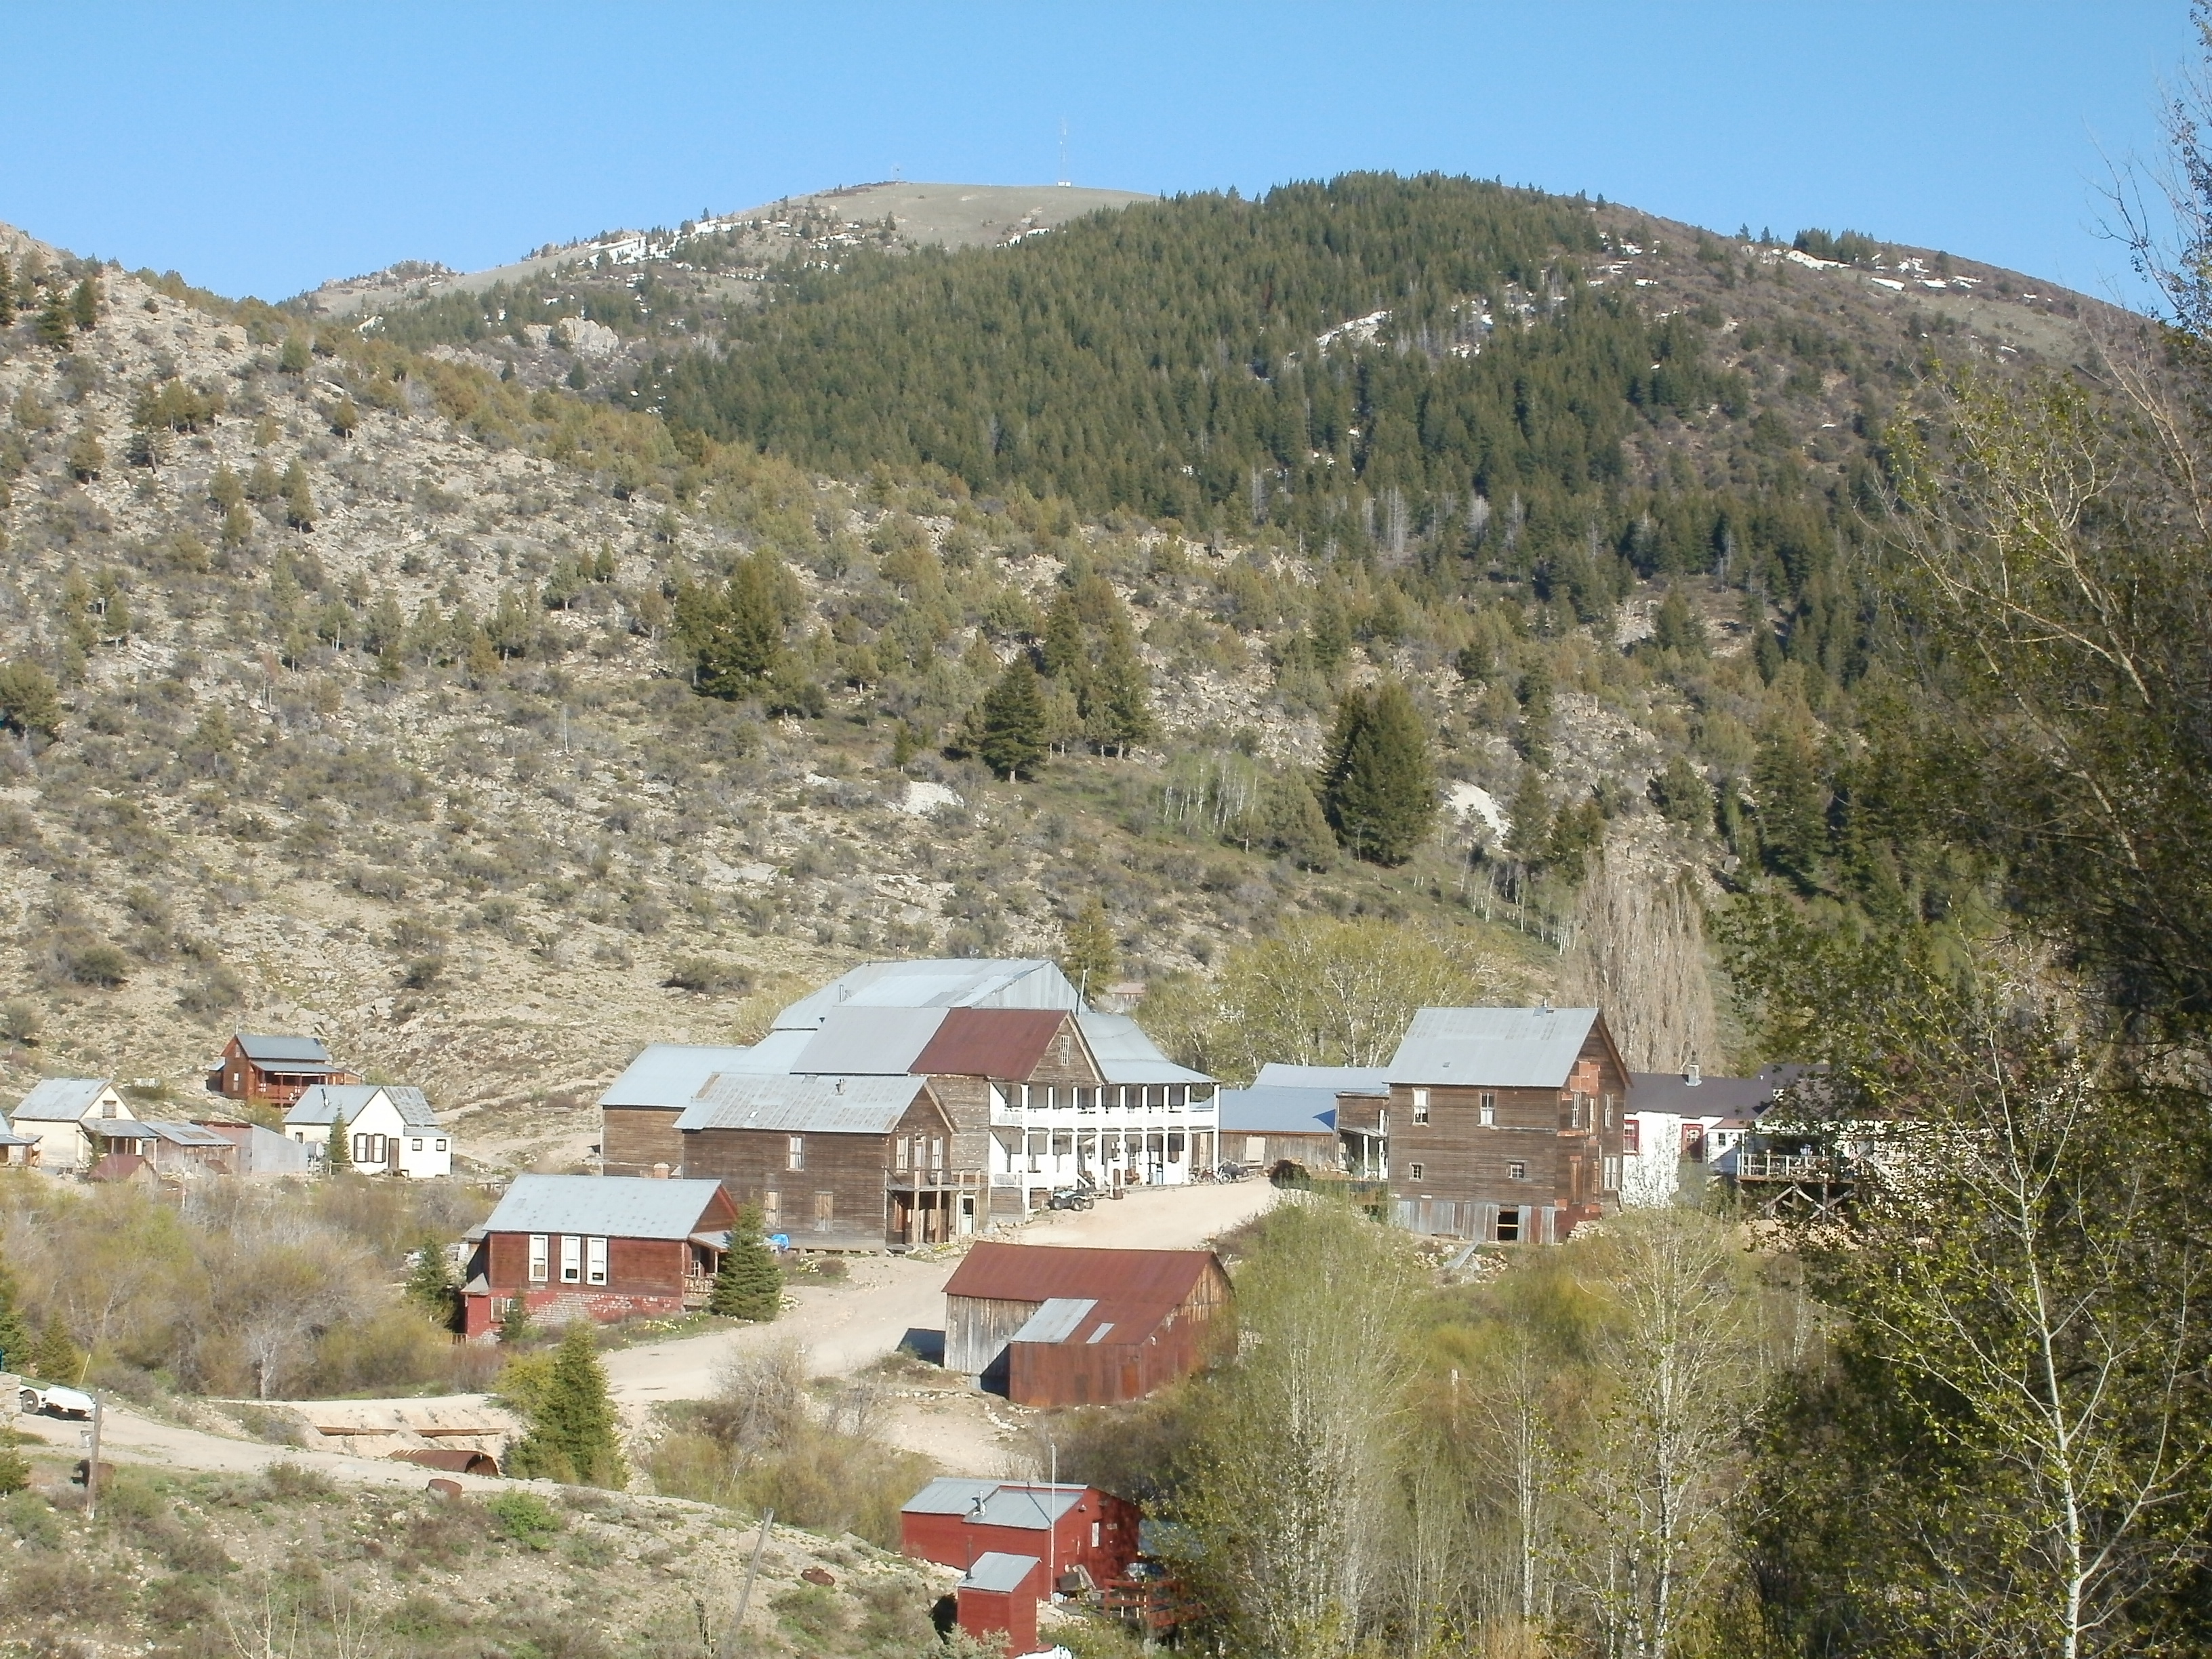
Silver City Adventures©2009
By Alan J. Chenworth
Originally Published in the International California Mining Journal in 2009
Over the years, I have developed a great love for Silver City, Idaho. It is a beautiful town situated in south-west Idaho, west of Mountain Home and only about 20 miles from the Oregon border. Silver City, as a town, is only inhabited during the summer months. There is no power, no paved roads and no access during the winter months—unless you like to snowmobile. The original hotel and bar remain open during the summer months; along with one or two other small stores or gift shops. These businesses, along with the rest of town, remain in a state of arrested decay. The original church is still there, and it is used for community services during the summer months, and the old school house now holds a small museum. No new structures are allowed in town. It is a fantastic place to visit.
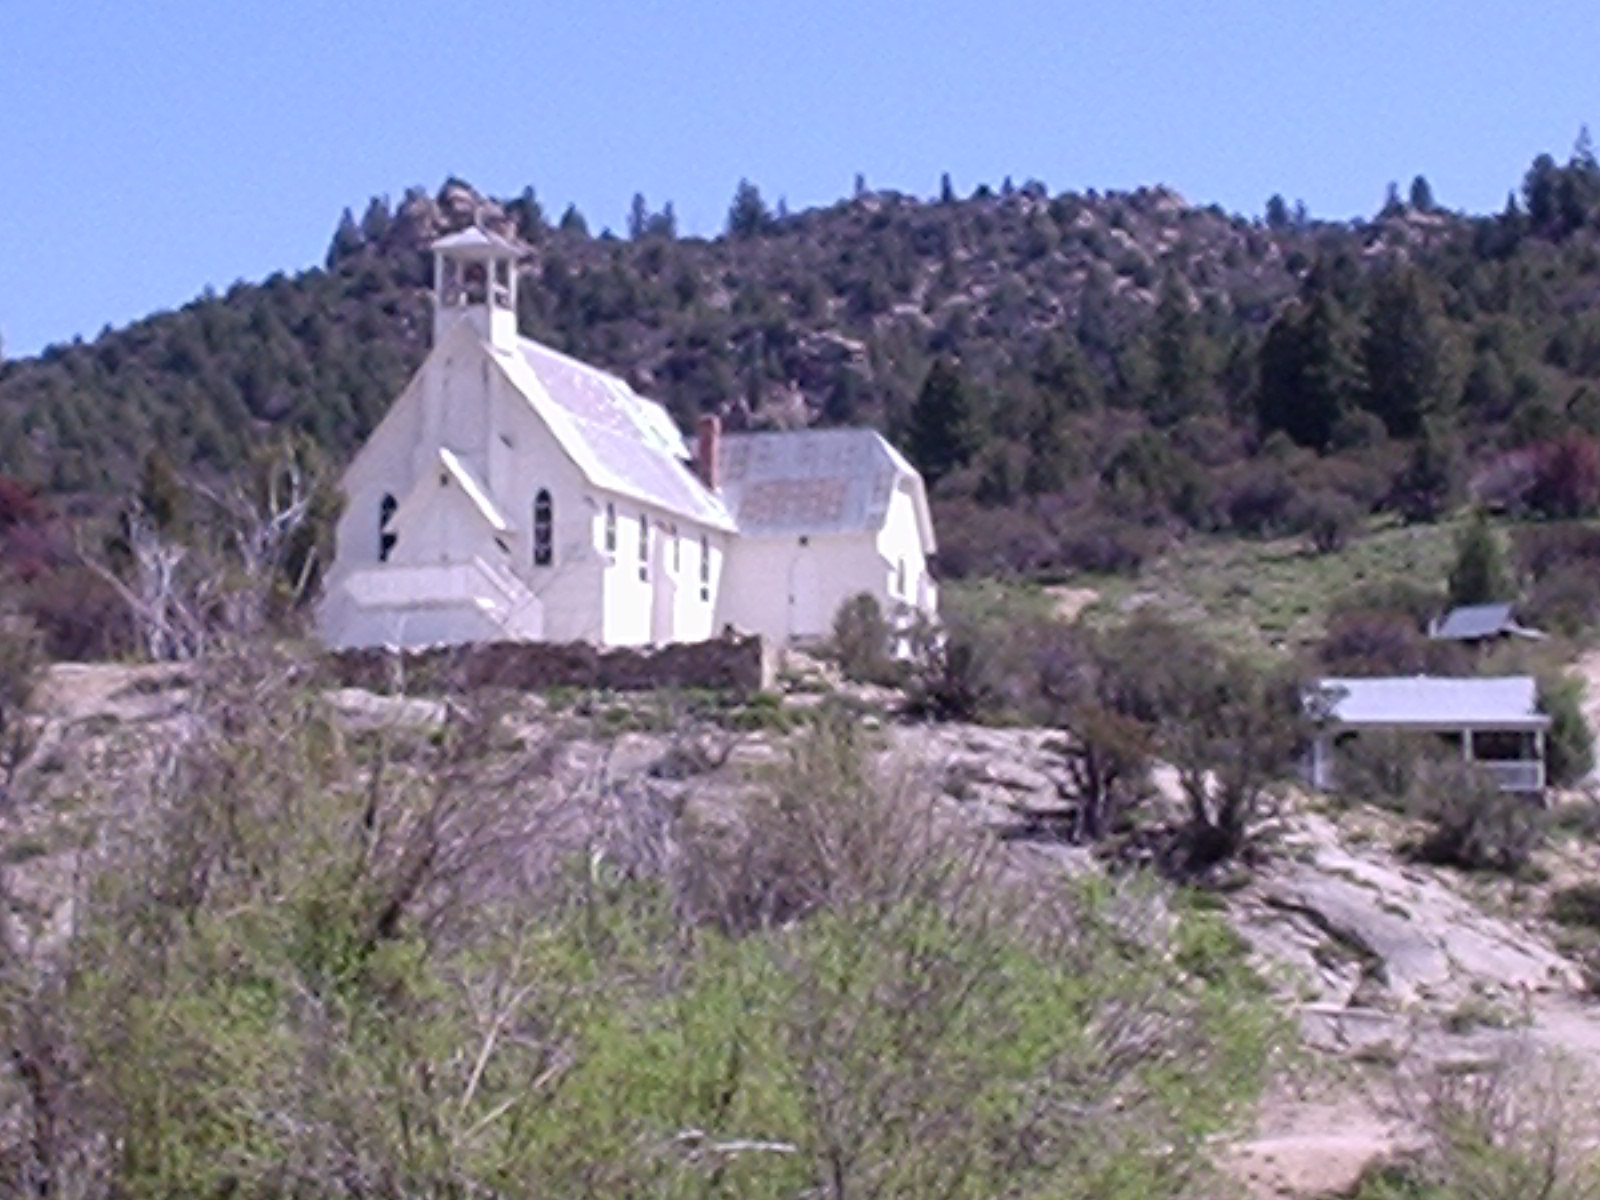
The Silver City church is still in use (occasionally).
Silver City got its start in about 1863, when gold was discovered in Jordan Creek. Between 1863 and 1864, about 4 million dollars in gold and silver was taken from the creek. Silver City is so named because of the large amounts of silver found there—between 20 and 100 oz silver for every ounce of gold.[1] Even the placer gold is only about 49% gold! The mines were worked continuously until 1942 when the War Act closed the mines. The copper wires were pulled out and the town was largely forgotten.
The first time I visited Silver City was in 2000. I set up a dredge below Ruby City (just N. of Silver City). After several days in the water, I had about ½ ounce of amalgam—and was very excited. It seemed I had paid for my trip. After burning off the mercury, I discovered that I had nearly ½ ounce of silver—yes there was a little gold in there, but not enough to pay for the gas to get there. It seems that there had been a mill there at one time, and they lost a lot of silver and mercury. If I had more than one dwt. of gold, I would be surprised. As a result I did not return there for many years.
 An old brewery in Silver City.
By 2005 I had joined with a club that had some claims on Jordan Creek. After hearing many success stories, I decided to give it another try. I purchased an Idaho State dredge permit and waited for Memorial Day (dredging is allowed year round, but there was no access until the snowplow opened the road for Memorial Day weekend). The temperature had been in the low 80’s for several weeks when I loaded up my truck, and things were looking good. A storm had been forecast to hit over the weekend, but I figured with 5 days in Silver City, I should still have 3 or 4 days of good weather. I could not have been more wrong. I got to Silver City late Friday night (OK, it was 2:30am Saturday morning), and the first few snowflakes began to fall as I pulled into the campsite. When I got up Saturday morning, there was 8 inches on the ground and it was falling fast. In all, it snowed for 3 days, then was cold and overcast the fourth. The river came up about a foot, and even if it hadn’t, it was too cold to dredge.
My fourth day there, I attempted to dredge—and even managed to get a hole to bedrock—but it was just too cold, and I finally gave up. After putting the dredge away (and warming up), I returned to the small side creek and worked by sluice for another hour. I didn’t do as well as the previous days, but did still pull out most of a dwt. The sun finally came out the next day as I was packing up camp and driving home. In all, I pulled out around ¼ oz of gold in about 5 or 6 hours of sluicing—and vowed that I would return the next year when the weather was better.
I did return the next year, and the weather was great—unfortunately, I woke up sick as a dog, and did almost nothing until the day that I was supposed to leave. I did watch some friends of mine do quite well in Jordan Creek though. You know what they say, “The third time is the charm.” With memories of the gold haunting me, I headed back to Silver City in 2008 for a four day weekend. I had my dredged packed and was eagerly waiting to see what the river had for me. Just my luck—another storm—it snowed the first day and rained the next two. Again, I grabbed my back-up sluice, and headed up the canyon. By now, I knew a little about the area. In order to see what the canyon really had to offer, I began to carefully sample my way up the creek. It took about an hour before I settled on some shallow bedrock that seemed to pay much better than the rest—the first sample pan had about 50 colors, and the second was just as good. It was here that I set up my sluice. I worked about 6 hours and cleaned out a small pocket with about ½ oz of nice clean gold. Not too bad.
<
The next day I returned and pushed up the creek. The gold had tapered off some from the day before, but by mid-day, I had worked up into another, even better, pocket. Again I pulled out about ½ ounce of gold, including a small nugget and a nice piece of 3-d wire-gold. The wire gold was three strands that were joined at both ends, but bowed out in the middle, similar to the top of a steel baluster. It was beautiful. By the third day, the weather had eased up, and I thought I would try dredging. I set up my dredge in a quiet spot in the river, and went to work. After dredging a hole about four feet deep—without hitting bedrock—I started to wonder what I was doing. I had a spot in the gulch that was paying about ½ oz per day, with easy work—where I could stay warm and dry—and I was dredging in a cold river in the late spring, when the river was too high and the temperature was too cold—and I wasn’t getting anywhere near as much gold as I had been. I figured I must be crazy. As soon as I finished off the first tank of gas, I pulled out of the river, dried off, and headed back up the gulch. I was able to pull another ¼ ounce of gold out of the river that evening. I left Silver City the next morning with about 1 ¼ ounces of placer gold. It was a good trip—and one that paid for itself, even with gasoline at nearly $5/gallon.

A productive trip!
As I drove home, feeling content with the ounce of gold in my pocket, I reviewed the trip. I decided that I was productive for two simple reasons: First, I sampled (a lot) before working. Remember, sample, sample, sample. If it isn’t paying, don’t waste your time; move on to a better spot. The second reason I was successful was that I had a back-up plan. In my experience dredges break, parts get lost, weather won’t cooperate, even health may prevent me from dredging—Every now and then, I may need to do something different. Always have a back-up. The Silver City area is a fantastic place to visit. It is rich in both history and mining, and it is beautiful. And while it has been a very productive district for almost 150 years—working there does have its challenges, especially with the weather. For me, there is nothing worse than taking a long trip, only to have it fall apart when you can’t dredge. I have found that with a little patience and planning, many bad situations can turn quite rosy. [1] W.W. Stanley, GOLD IN IDAHO, 1946, Idaho Bureau of Mines and Geology, 53 p., Owyhee County, p. 37-39.
Please go to the Prospectors Page (or Prospectors Page 2) to see more articles.
A friend at work recently showed me a must see video. The video is an old black and white silent film from 1927 that details mining from prospecting through production, with film shot at mine sights from Alaska to Arizona (with a stop in Utah). It details mining processes to include open pit mining and detailed descriptions of underground mining techniques. Interesting photos of historical mining towns are included. Check out the film here:
The Story of Copper Mining
http://research.archives.gov/description/12449
08/29/13
About Dry-washing and Crescent Creek
Here, I am dry washing for gold on Crescent Creek, just below the Henry Mountains in southern Utah.
04/14/13
I recently met with Donnie Morris of Confetti Books and Antiques in Spanish Fork, Utah to do an interview for his television show Turning the Page--where we talk about the book A Guide to Gold Panning in Utah. Here is Part 1.
Here is Part 2 of the Turning the Page interview on Gold Panning in Utah.
11/17/12
Exploring a New Prospecting Area: The Drum Mountains©
by Alan Chenworth
This article was Originally Printed in the Gold Prospector Magazine in the spring (June?) of 2012.  Living in Utah (where placer gold is a little scarce), I am always on the lookout for a new place to pan for gold. As I have done this over the years, I have developed something of a method that I follow to determine which areas warrant my time and further exploration. And having just returned from a prospecting trip to a new area, I thought that I would take a few minutes and write down the recommended steps for exploring one, using this trip as an example. 1. RUMOR Exploring a new area starts with the rumors. A friend once told me that he had found placer gold in the Drum Mountains in central Utah. The Drum Mountains are north of Delta, west of the IPP Power Plant, and just to the south of Topaz Mountain. They are a low lying range of mountains –very dry, and having no known springs—in the middle of Utah’s West Desert. Vegetation is sparse; mostly grass and sage, but there are some juniper trees in the canyons and at higher elevations. I have been to the Drums before, visiting a group of manganese mines on the north end of the range (including the Black Boy Mine), but I found no gold. As I remembered my friend’s story, it occurred to me that he said he’d found his gold on the south side of the range. I had not explored the south side of the range, and knew little of the history and geology. 2. MAP The step was to pull out a map of the Drum Mountains. I use topographical maps, and in fact purchased a complete set of topographical maps for the state of Utah. As I began looking over the maps, it became apparent that there is a lot more to this range than I had believed. The 1:24,000 topo maps often show a lot of detail, including mines, prospects, adits, shafts and cabins. The range—from north to south—was completely riddled with old mines. In fact, some of the largest mines were on the south end of the range. The topo map even showed where the tailings were left from past mining operations. It became apparent that there was a lot I didn’t know about the area, and it was time to hit the books. 3. HISTORY The third thing that I did was to look for the history of the district. For just such an occasion, I have a book entitled The Ore Deposits of Utah, written by a collection of Geologists (Butler, et al) in about 1919. Here is what I found. The mines of the area were organized as the Drum Mining District in 1872. After the mines failed, it was re-organized as the Detroit Mining District in 1879. The principal mines of the area were the E.P.H, Charm, Ibex and Copperhead claims. I was not able to determine the total value of metals recovered from this district, but at one point (probably in the 1890’s), the 130,000 pounds of copper bullion that this district produced made it the largest producer of copper in the state. That is significant in a state that home the Bingham Canyon Copper Mine. A chart found in the book showed that between 1904 and 1917 there was $45,808 dollars worth of gold, silver and copper produced in the district. This does not include any lead or zinc produced by the district. It also does not count the manganese, as it was produced later (and in a different part of the range); or a larger gold mine on the south end of the range that was worked at a relatively recent date.
  The remains of the Drum Mine, found on the Southwest side of the range. 4. GEOLOGY Finding out that there has been gold and other precious metals produced here in a commercial quantity peaked my interest, and I started looking at the geology of the range. It seems that most of the range is in limestone. That is not a good sign for gold placers, but read on. V.C. Heikes (one of the writers in Ore Deposits of Utah) reported there have been some small monzonite dikes that have intruded the limestone country rock. (Monzonite is similar to granite, except with little or no quartz in the rock). While there was some mineralization near these dikes, the dikes were not near the productive mines of the area. Instead, the mineralized zones were located in replacement fissures—places where the fluid flow in faults and fissures had replaced the limestone with silica and various ore minerals. These areas were referred to as “reefs” because these narrow, silicified veins were much harder than the surrounding limestone. These reefs reportedly contained pyrite, or if oxidized, limonite; as well as chalcopyrite and its oxides, such as azurite, malachite. . . . Some galena and bismuth have also been found in the area. The ore was principally copper ore, but averaged over 5 oz silver and about 1/3rd ounce gold to the ton—some of the mines even reported gold values in the range of ½ to ¾ ounces per ton.
An open shaft near the Crows Nest cabin, to the north of the Drum Mine.
5. Field Visit Now that I knew that there was abundant mining in the area—and that the area mines were relatively rich with precious metals (including gold), it became clear that a field visit was in order. I picked a weekend at the end of March to visit the area. It was late enough in the year that snow would not likely be a problem, but early enough that it isn’t too hot. The weather forecast was advertising rain and snow for the day, but we decided to chance it. It took about two hours to get there from Salt Lake City, but the roads were good and the weather was holding off. We started at the south end of the range, in the canyon above one of the bigger mines in the area. As we drove up the canyon, I noticed shale beds off to the west of the road, while everything else around us was dark limestone. Those of you who know gold will understand that limestone and shale do not usually make for a good placer deposit. However, knowing that trilobites are found in the similar looking shale in the House range to the west, I thought it would be fun to look for trilobites. It took about 30 seconds before I found one, and had another in a few seconds more. A little bit more looking left me with a piece of shale that was loaded with pieces of broken trilobites. This is not what I came for so we didn’t stay long, but it was fun and interesting. I will keep it in mind for future reference. As we followed the canyon up, it broadened out and split into two canyons. We kept to the right on the main road, and found ourselves at an old mine, complete with two cabins and an outhouse. One cabin had fallen down, but the other was still standing, and seemed to be kept in decent shape for overnight visitors (some of which may bring a keg or two). The mine itself consisted of a deep shaft (60-80’ in depth) alongside a larger open cut. Several drifts also took off from the inside of the open cut to unknown destinations. I wasn’t about to follow them. In the mining area, I found a large shear zone, complete with silicified breccias (angular broken rocks in a fault) and large amounts of iron oxide—probably limonite. Several rocks found on the dump showed traces of copper staining, but no visible ore was seen. Several small, old ceramic crucibles were seen next to the fallen down cabin, which indicates that it may have been used an assay office. We had been there about thirty minutes when it started to snow and we headed down the canyon. By the time we got to the bottom of the canyon, it had stopped snowing, so we came around the west side of the mountain to the north and headed up the next canyon. A couple of miles up, we found a tunnel and a set of shafts that were following another reef. Again, the reef was in limestone, but the rock was faulted and broken. The fault zone was about 4 feet wide with a 1-2 ft oxidized layer running down the middle of it—and replaced with silica and red iron oxide (limonite). There was no other visible mineralization. Whatever had been in the reef was completely mined out. We also did not go down into the shafts because they were very deep and unsafe. As we left, one of our group wanted to walk down and out of the canyon. When we picked him up, he showed us a piece of float that he had picked up at the base of the canyon near the main road. This rock had a small ball of blue azurite on one end, and small flecks of green (malachite?) below it. There is (or was) copper ore in the area. As we continued north, we came to the next canyon, the largest and most prominent of the canyons on the west side. As we started up the canyon, the base was very narrow, but soon opened up into a broad canyon. Small mines and prospects were seen throughout the area, with their bright red, limonite stained dumps standing out. We followed the road to the top of the canyon, where just below the peak, we found several more mines. These were the largest of the old mines in the area. There were large, deep shafts and adits following the quartz reefs. Iron staining and limonite was abundant, but there were few other minerals visible, and we saw no sulfide ore on the dumps. It is a very interesting place, but the snow started up again while we were on the peak, and we were forced to head back down. We got out and back to the highway just before the storm got bad—and rain in the lower elevations made the road impassible. 6. Sample Mining in the range has been extensive, but without drilling or going down into the shafts and adits, it could be difficult to find any significant mineralization. We did take small gravel samples from the bottoms of the main drainages to see if there was any placer gold. Surprisingly, there was some fine black sand—I didn’t expect to see black sand with all the limestone in the area. There wasn’t a lot, but there was some—and a little gold. I found one small piece of very shiny gold, and 4 or 5 much smaller specs. I was actually using a hand lens to examine the black sand for gold. I cannot yet quantify the gold as these were very small samples, and the gold was even smaller. It does appear that there is free milling gold in the Drums, but it is very small in size and probably quite spread out. Low grade placers are a possibility. The Drum Mountains are covered with active load claims, and much of the canyon bottoms are covered in placer claims. This made it very difficult to find places to sample. From what I have seen, the placer claims probably aren’t there because of the profitable placers in the area. Instead, they’re being filed “just in case” something turns up or to prevent someone else from filing on them—probably something of a safety net. The load claims, however, could someday be of value when someone decides to drill and finds another high grade vein, or possibly a deeply buried porphyry deposit.  7. Review The last, and possibly the most important thing to do is take the time to review your trip. It would be best to do this before you leave the prospecting site, but make sure you review the trip somewhere along the way. I left in a snow storm, so I waited until I was home to review the trip. I pulled out the maps and methodically went over all the mines and drainages that I visited. What I found out was that a narrow, unimportant dirt road that I passed by was actually the access road to the largest canyon on the south side of the range—and incidentally, the access to the Ibex Mine, which was also the largest producer. It seems that bad weather, a lack of time, and a lack of attention to the map details means that I will need to take another trip out there to examine the best chance for a placer deposit in the range. Had I slowed down, and checked the map closer, I would have visited the drainage below the Ibex mine first. I saw the road, but it looked insignificant—I didn’t think the road went anywhere. Big mistake. Now that I have reviewed the trip and identified a problem, I know where to check on my next trip to the Drums. This is just a simple example of the method that I use to explore new prospecting areas. The steps to this method are cheap and effective. They don’t take much of time, and it gives me something to do in the winter while I wait for the snow to melt. It also allows me to prioritize all of the prospects that are vying for my attention and time in the field. IF an area checks out with all of the above steps, I move to Step 8—Filing a claim; but this will have to wait to another day as it is a separate, multi-step process am not ready to do in the Drums, and that I don’t have time to cover in this article. Reference: Butler B.S., Loughlin, G.F., Hiekes, V.C., and Others, 1920, The Ore Deposits of Utah, USGS Prof. Paper 111, Detroit District, p. 463-465.
08/22/12
Definitions of Mining Claims©
By Alan Chenworth
Under the Mining Laws of 1872, there are four types of mining claims that are recognized by the BLM. These include (1) Placer Claims (2) Load Claims (3) Tunnel Site Claims, and (4) Mill Sites. As I often get questions about mining claims and how to file them, I will review these claim types and how to file them. Minerals which can be filed on generally include all metallic mineral deposits such as (but not limited to) gold, silver, copper, lead, uranium, and iron. The list of things that can be filed on also includes non-metallic minerals such as gemstones, bentonite (clay), and non-standard rock such as gypsum, chemical grade silica, pumice and cinders may also be filed on.[i] Rock products such as gravel, boulders, and quarried stone are not locatable minerals. Neither are fossils—and caves cannot be located under a mining claim. These types of things are generally dealt with under a lease agreement with the BLM. Mining claims are considered real property, and can be bought, sold, written into wills, and can be used as collateral on a loan. Here (below) are the definitions of the claim types. Definitions have been taken directly from BLM websites. Placer Claim Definition Courtesy of the BLM[ii] Placer - All deposits, other than lodes. These include placer deposits of sand and gravel containing free gold and other minerals. Placer claims are located by legal subdivision. An individual may locate up to 20 acres with a maximum of 160 contiguous acres with 8 or more people (an association). A corporation is consider[ed] a single locator. (43 CFR 3842) A Placer Claim is meant to be used for placer deposits. A placer is a mineral that has been weathered from its host rock, and often eroded to another area where it forms an economical deposit. Therefore, a placer gold deposit is a deposit of gold that has been moved from its original location. Generally, placer deposits are in canyons, and along creeks. Often in desert areas, these deposits are found in alluvial fans. Placer claims include anything from the bedrock to the land surface. A standard placer claim is 20 acres (or less), but may be filed as an Association Claim, meaning that multiple claims may be filed as one (up to eight) for a total claim size of up to 160 acres; provided that there is one claim locator for every 20 acres of claim. The claim may be filed in just about any shape, though square or rectangle is most common. An association claim is designed to benefit small miners, as a small group of miners may claim more land and pay less fees. **As of the writing of this article (August 2012), the BLM has begun to charge a separate assessment fee for every 20 acres of an Association Claim, though the small miners exemption will still be in effect. The fees were approved by Congress in the Dept. of the Interiors 2012 annual budget. Laws governing mining claims often vary from state to state, but in Utah, a load claim can be filed over a placer, but only if the owner of the placer gives permission for the load claim to be filed. If they do not have permission, the claim is invalid and the locator of the load claim has committed mineral trespass. If the owner of a placer claim wishes to work the load under his claim, he must file a load claim before work can begin. Lode Claim Definition (Courtesy of the BLM) Lode - A classic vein, ledge, or other rock in place between definite walls. A lode claim is located by metes and bounds. The maximum length is 1,500 feet by 600 feet. (43 CFR 3841) A lode claim is meant to claim any locatable mineral that is in its original place of deposition and still hosted within the original host rock. Veins, porphyry deposits and Carlin style gold deposits are good examples of this. Most uranium deposits are also filed under this type of claim. Generally, these claims start at the surface of the bedrock and go down. There is no lower limit to these claims. These claims are approximately 20 acres, and are a standard 1500 feet long and 600 feet wide. Generally, the long direction of the claim runs along the strike of the vein, with the point of discovery in the center at one end (300 feet on either side of it). In Utah, a lode claim takes supremacy over a placer, meaning that a placer cannot be filed over a load, unless it is by the owner of the load claim. The owner of a load claim cannot work the placer without filing on the placer. In Nevada, you cannot legally file a placer over a lode—not even the owner of the lode claim. Laws governing lodes and placers vary from state to state—check with the BLM for your particular area of interest. Definition of a Tunnel Site Claim (Courtesy of the BLM) Tunnel Site - A tunnel site is where a tunnel is run to develop a vein or lode. It may also be used for the discovery of unknown veins or lodes. To stake a tunnel site, two stakes are placed up to 3,000 feet apart on the line of the proposed tunnel. Recordation is the same as a lode claim. A Tunnel Site can be regarded more as a right-a-way, than a mining claim. (43 CFR 3843) A Tunnel Site is different from a load claim in that it can be twice as long, and is used as a right of way. To the best of my understanding, if a load is discovered while driving a tunnel, a load claim should also be filed. Definition of a Mill Site Claim (Courtesy of the BLM) Mill Site - Public lands which are non-mineral in character. Mill Sites may be located in connection with a placer or lode claim for mining and milling purposes or as an independent/custom mill site that is independent of a mining claim. Mill Sites are located by metes and bounds or legal subdivision and are up to 5 acres in size. (43 CFR 3844) Mill Sites are non-mineral claims that are used specifically for mining and milling, and are no more than 5 acres in size. These areas are generally located near the mining areas, but in places where no mineral is likely to be found. Filing a Claim While most people often think of claim staking as difficult or complex—it is actually quite simple, provided you follow the correct steps. The first thing to do is find a place that you are interested in. It should be somewhere that there is a deposit that can be mined at a profit. The mining laws state that the claim should be something that the prudent man could work at a profit, given the highest commodity price in the last 10 years. If the claim does not meet this test, the BLM can come in and invalidate the claim. The BLM has done this in the past and will likely do this more in the future as the anti-mining sentiment increases within the government and public. After you find a deposit or an area you are interested in, you should get a topographical map of the area. From this map you can get the Township, Range and Section (and quarter section). Go to the BLM LR200 Website (a public database). See the address below. \http://www.blm.gov/landandresourcesreports/rptapp/criteria_select.cfm?rptId=19&APPCD=2& Here, you type in the information (state, survey meridian and township/range info), and it will give you a list of all active mining claims in the section, also telling you which quarter section it is in. Look for the area you are interested in, or any areas that appear to be open. If there are any claims listed in the quarter section where you have an interest, write down the claim name and claim ID number. Call the BLM, and ask for a Notice of Location and Location Map for each claim. This will allow you to see exactly where the claim is located, along with the contact information of the owners of any adjoining claims. Once you have found a section of open ground, call the BLM and get a Master Title Plat for the area of interest. This is a map that shows private property, patented mining claims, mineral withdrawals, and any Right of ways. On one occasion I forgot to do this step, and when I went to file the claim, I found that the mineral rights in the area I was interested in had been withdrawn. After doing all this, if it still appears to be open and unclaimed, you can go ahead and claim it. This is done by putting up a copy of the Notice of Location (make sure you sign it) on the discovery post, then post all 4 corners. The Discovery can be on a corner. A GPS is the best way to post the corners, but is not required—although accuracy is important. This can be done with a stone cairn, or a wooden post (4x4 is preferred, though many states allow a 2x2—and PVC pipe is also often used, though discouraged). At this point, you need to take the ORIGINAL Notice of Location (NOL)—signed—and send it to the Office of the Recorder of the county in which the claim is filed. The time limit for this varies by state—in Utah it is 30 days, while Idaho is 90 days from the date of location. When you get it back from the county (with the county stamp), you must then send it to the BLM within 90 days from the date of location. I generally wait most of the 90 days before I send in the fees and NOL to the BLM so that I can check and see if someone else has filed a claim on the same land (It is hard to get your money back if you get beat out). The fees to file the claim include: County recording fees (variable, generally $10-20 per claim); BLM Claim fees of $189 (including the first years assessment—$140, a $34 location fee, and a $15 registration fee). After this, it generally takes $140 for the annual assessment and $10 per claim to keep the claim every year. The $140 annual assessment fee can be waived if you qualify for a small miner’s exemption (meaning you have 10 or fewer claims and are not registered as a corporation). To get the fee waived, you must file a Maintenance Fee Waiver Certification for each claim, each year before September 1st. To hold on to the claims you must also file an annual Affidavit of Assessment before December 30th. As always, check with your local BLM office for of
**NOTICE** Annual Fee Changes to Association Placer Claims to be announced by the BLM May 22, 2012 The BLM is looking to change the way it collects fees on Association placer claims. An association claim is a placer claim that allows multiple claimants to work together under one claim—and file 20 acres for each locator listed on the claim These claims can have up to 8 people and 160 acres. According to the BLM, Association Claims will be charged an annual assessment fee equal to the number claims you would have if they were filed 20 acres claim at a time, rather than as one block; and that this change is due to come out sometime later this year. The holders of a 160 acre placer claim currently pay $140 annually in assessment fees. After the change goes through, the claim holders will pay $140 for each of the 20 acre claim blocks included within it (for a total fee of $1120 per year). This is a big change. As it currently stands, the Small Miners Exemption is still in effect, so any non-corporate entity with 10 or fewer claims during the year will still be able to do assessment work in instead of paying the fees. This will, however, cause a lot of problems for small to mid size miners that are looking to develop a claim block. According to the BLM representative that I spoke with, this is already “approved” and will be implemented. Apparently it is not (and has not been) open for public comment. If this change affects you, you should contact the BLM (and possibly a mining attorney) to see what your options will be. It would also be a good idea to contact your local Congressman, as they probably have no idea of the changes about to take effect. Miners should also be aware that the current administration (Obama Administration) is looking to undermine (or eliminate) the Mining Laws of 1872, and replace them with a lease/fee permit system instead.
02/18/2012
Here, I demonstrate how to set up a sluice. I am using a Gold Savers Sluice from the Roaring Camp Mining Company. I am working on a claim owned by the St. George Prospecting Club.
One Step at a Time . . .©
By Alan Chenworth
During the last year, we have been treated to a fantastic show about a group of people who opened a gold mine in Alaska. As near as I can tell, it is a show where a bunch of unemployed, arrogant know-nothings try to open a gold mine and make a living. I call the show fantastic—not because it is that good of a show—but because it is a fantastic example of most of the common mistakes (though exaggerated) that prospectors make. As I write this article, please bear in mind that I do not have TV, and did not watch the entire show. I did, however, get regular updates from people at work who did watch it. I also have the internet and watched the short clips of the show that were posted on Hulu (I think that they were enough for me to see that I didn’t need to watch the show). Here is some of what I learned: 1: Be honest with yourself. I watched a group of greenhorns head up to Alaska to open a gold mine. None of them knew anything about mining, geology or even Alaska. They didn’t know how to pan, what to look for or where to look. Most of them didn’t even know how to run or repair the equipment that was to be their livelihood. And none of them were willing to admit to themselves or the camera that they were in way over their heads and should not be going to Alaska. I guess that they thought they had nothing to lose. How wrong could they be? When you start down the road to gold mining, you have to start at the beginning—just like you do with everything else. A baby needs to learn to crawl before he walks; and walk before he runs. The same is true with mining. Maybe you should spend some time in a creek with a gold pan before investing large sums of money into large mining equipment. As Clint Eastwood was quoted as saying, “A man’s got to know his limitations.” Before getting involved with any large mining operation, you should take inventory of yourself. Know your limitations—they are great starting points as you continue to learn and grow. For example, if you have never run a dredge, taking over a lease off the coast of Nome, Alaska may not be a great idea, no matter how good the gold. Instead, it may be better to purchase a small dredge and practice on the local creeks for a few years. This would give you a chance to understand how to work the dredge, do small repairs, work underwater, prepare for cold-water work and process the concentrates. This was just like the miners in the Alaska show . . . They took on too much too soon, and they got spanked. 2: Listen to those who know. (Keep in mind that I did not watch much of the show.) The poor greenhorns listened to the experts long enough to be convinced that there was gold in the area. The guy on the other side of the creek was making bank on his claim, and assays seemed to support that the gold was there. However, when it came time to actually mine, they ignored the advice of the seasoned miners and did things their own way (and no, it didn’t work out too well). As with anything else, it is a pretty good bet that the guys who have been doing this for a while probably know what they are doing—even if you don’t understand why. Listen to what they have to say. ASK QUESTIONS. Be patient. Try out what you have been told—put it to the test—then ask more questions. Learning is a process. It took the guys on the Alaska show most of the working season to finally get back to doing what they were told at the start of their operations. 3. Get some experience. As I have already mentioned, these guys didn’t know anything about mining before buying a mine. While it may make a good TV show, it is probably not a good approach to life. The fact of the matter is that these guys would have believed anything they were told if the person they were listening to was holding a large gold nugget—Even if there was no gold on the claim. I remember seeing one clip where the old guy pans down some material and shows the others some gold. He tells them something to the effect of “We are getting close—look there is about $20 dollars worth of gold in the pan.” Well, yes, there was gold in the pan. Was it $20? I don’t think so. Maybe it was a bad camera angle, or my eye sight is bad, or I didn’t see all of it, but it looked like two or three dollars to me. None of the other miners knew enough about it to tell him he was wrong. They didn’t know what to expect or how to value the gold. They weren’t ready to be mining commercially. All placer miners need to develop a set of skills that include all of the common mining tasks such as: learning how to pan, run a sluice, clean the concentrates, and work with amalgam. It would also be a good idea to learn how to use common mining equipment, including (but not limited to highbankers, trommels , pumps, backhoes, bulldozers, and other earth-moving equipment) before taking on a major mining venture (or even a minor one). Learn the basics before trying to do the big complex tasks required in mining. 4. Do your homework. What is the local geology? How deep is the gold? Is it all on bedrock, or is there a pay-layer or pay-streak? How is it identified? Could there be a chance that the claim on the other side of river has different geology than you do? (Just because he is getting good gold does not mean you will). Is the gold fine or coarse? How pure is it? (a 0.920 fine gold 50 % more gold than a 0.610 fine gold). If you don’t do your homework, you can’t properly evaluate the property. We also need to look at equipment. They needed heavy equipment in order to work the claim—and bought it used. In my book, they overpaid, but probably didn’t know that because they didn’t do their homework. The equipment was in bad shape as well, causing them no end of problems. Mining is a very capital-intensive venture, and you cannot just look at the amount of gold that has been estimated to be contained in the deposit as the amount of money that you will make. Fuel will eat into that amount very quickly (even more so in remote Alaska). Machinery, spare parts, repairs, hoses and oil are all expensive. Down time costs even more—as we saw in the show when they ran into winter weather that shut them down. What about food, shelter, and medical costs? You have to have them. Did they run the numbers that they needed to? I don’t think so. They didn’t even pay for the cost of the claim, let alone their time or equipment. Do your homework—this will take time—and hire a professional if needed. A good professional will be worth the fees you pay. The guys on the show really needed to do some homework before going to Alaska. 5. Too many Partners are bad. This one is going to be short and sweet. You want as few partners as possible. Too many people mean small profits. Everybody gets a share, so the share gets smaller for every person added to the payroll. Too many partners also means too many people wanting to do things in different ways. The more partners you have, the harder it is to come to a consensus on where to work, how to work and when to work. People will also tend to pick favorites, make buddies, and team up/gang up on others. Eventually someone will be outcast. Not good. The last reason too many partners are bad is that not all people work with the same intensity. I have watched gold splits be done on common operations where one guy donates the equipment and gas, then spends 12 hours digging or dredging while someone else works two hours, has a beer, takes a hike and talks our ears off, all while expecting an equal cut of the gold, mostly just because he was there. I saw problems on the Alaska show that were likely caused by both too many partners and by picking the wrong partners. 6. Don’t put all your eggs in one basket. In the Alaska show, I watched people quit jobs, sell houses, and move across the country to a strange and unfamiliar land to do something that sounded fun—but which they knew nothing about. This was probably not the smartest thing these people have ever done. Before I sell my house to pay for a claim and some worn out mining equipment, I will have worked the claim, already had it paying well, and determined that I had enough ore in reserve to make up the money that I have invested, replace the house and provide for my family in the future. If you wouldn’t sell everything you had to buy a factory that moulds cheese into small flower shapes or left handed forks, you probably shouldn’t sell everything to buy an unproven gold mine in a state where you have never been and equipment you don’t know how to operate. Mining is a business and should be approached as one—with care, planning, experience and patience. Go slowly—Investing and building things up as you can—while building your base of knowledge. 7. GOLD FEVER is REAL! This is probably the most important of the points. Gold fever is real. Never, EVER, forget that. People change when they see gold. Some people can handle it, but many can’t. People will lie, cheat and steal to get it. It can ruin a good friendship, push partners apart, destroy businesses and get in between families. People will kill to get it. Even among the honest, it breeds paranoia as they begin to think you are taking their gold. Pick partners that you can trust—preferably people you have worked with in the past. The only way to know you can trust them is to already have a history with them. When two people work together, each trying to make sure that the other gets the bigger half—when each are working to make sure the other feels he is being treated fairly—then it has a chance to work out. Problems will always arise, but when you both approach the problem with respect and understanding of the other, things will usually work out. Conclusion: The problems that I saw in the Alaska show were not new ones that I had never seen before—I have seen examples of this in my own life. Several years ago, I met a young man that had recently been smitten by the gold bug. I met him at a small, local club meeting, and we chatted about mining for a short time. He had been panning for a few months and really liked it. And he had found a little gold (I think it was less than a gram) on some club claims. A few weeks later, I got a call from him wanting advice on mining equipment. He had a chance to buy a used trommel for something like $6000. He was self-employed, and while not rich, money was not an object. Should he buy it? Had I used one like it? Could he use it on my claims (he would give me a cut, of course). I tried hard to slow him down. I told him to buy a sluice and work it for a while. To put some time into learning techniques—proper sluice set up, how to pan better, where to look for gold, how to clean up the concentrates. Maybe then he would be ready to buy a high-banker or small dredge—or maybe a metal detector. This would also give him a chance to explore new areas, learn to set up and use new equipment, and maybe find a deposit worth working. It would also give him a chance to see if this was really something that he wanted to pursue, and to see if he could make any money at it. Most small miners and prospectors don’t find enough gold to pay for their gas, let alone the equipment. Generally speaking, the smaller the mining operation is in terms of equipment and overhead, the better. You want to run as much material as you can through as little equipment as possible. As your overhead gets smaller, you will need to generate correspondingly less revenue to be successful. When I hung up, he was still determined to buy the equipment. I don’t know what happened after that—I never saw him again. I hope things worked out, that he found a pile of gold, but I suspect that the trommel never paid for itself. I am sure the show was truly fun to watch for millions of Americans. It has given them a sense of hope, a taste of adventure, with enough of a struggle to make it fulfilling in the end. It also gave prospectors both a good laugh and glimpse into the myriad of mistakes that are possible when we lose touch with reality. I hope it becomes a good tool to teach us all to be better prospectors and better people.
8/28/11
Here is a short video that shows the Crescent Creek Public Panning area in Henry Mountains of Southern Utah. It is a neat area. The gold can be good at times, though it is a bit spotty.
5/23/11
Is there Gold on Navajo Mountain?
By Alan Chenworth
For years I have been hearing rumors of gold found on or around Navajo Mountain. I had pretty much written them off as unfounded rumors due to the fact that I have never seen any fold from Navajo mountain, never talked to anyone that has personally found any; coupled with the fact that it is considered to be “sacred” land and the Indians don't want any prospectors going up there. That being said, there is a documented history of mining in the area. In fact, an old Indian named “Hashkeniinii” was rumored to have a rich silver mine on the mountain; and several years later, there were four prospectors killed on Navajo Mountain, as they were searching for the silver mine. In the late 1940's, there was also a uranium boom on Navajo Mountain, when Luke Yazzie, a local Navajo, brought rich uranium ore into a trading post in Monument Valley. A large mining company came in and put a mine in on the ledge where Luke got his ore, making the tribe a lot of money while though Luke got nothing but a free lunch. Navajo mountain sits just to the north of the Arizona-Utah state line in south central Utah—in the heart of Navajo Country—and was originally called Sierra Panoche. It is a tall, isolated dome that reaches up to 10,416 feet in elevation, and is formed by a mushroom shaped volcanic intrusion called a laccolith. It is an important source of water for the region, a source for game, and contains the only stand of limber pine in Navajo country. Apparently Navajos regard it as sacred because Navajo Mountain is the the “head” of a Navajo maiden, whose “body” is formed by four regional mountains. (This is similar to the Ute legend of the Maiden whose body can be seen in the Timpanogos Mountain above Provo UT). Navajo mountain is located completely on Navajo land, and the Navajos offer permits for hiking and camping—but apparently getting one can be a hit or miss proposition, depending on who you talk to, or what mood they are in. One thing that I do know is that mining and prospecting will not be considered. (That is one of the reasons I have not looked too hard into the rumors of gold around Navajo Mountain). I have lately been researching the Abajo Mountains, and Blanding Mesa, and came across a a paper called Potential for Alkaline Igneous Rock-Related Gold Deposits in the Colorado Plateau by Felix Mutschler, Edwain Larsen and Micheal Ross. In this paper, they discussed the composition of the laccoliths in southern Utah and correlated the intrusions with gold mineralization. Gold occurrences are found in the Henry Mountains, in the La Sal Mountains, and in the Blues (or Abajo mountains). These three mountains are also closely related in many other ways: spatially-they are all relatively close together geographically; they are structurally similar—all three of these intrusions being laccoliths; age—the laccoliths all have similar ages of emplacement, with the dates of the intrusion being set at between 23 and 32 million years ago; and they are chemically similar—with a similar composition of both rock type and mineralogy—they are all diorite porphyries, and all have gold (or copper gold) mineralization. These three are also closely related to 3 more laccoliths in western Colorado that are also mineralized with copper, gold or silver. Navajo Mountain was included smack dab in the middle of the list of diorite porphyry laccoliths is Navajo Mountain, and it shares all the same characteristics as the other laccoliths in the region.  Here is a good photo of several pieces of river worn diorite porphyry, and it is often associated with gold. This photo was taken in Cottonwood Wash with gravel from the Blanding Mesa. The original source of the diorite porphyry is the Abajo laccolith. If all of the other diorite porphyry laccoliths are minereralized—most containing gold—then there is a very good chance of finding gold on Navajo Mountain. It is possible that there are small placers in the areas drainage's. More importantly, as the paper pointed out, there may be larger, low sulfide, sediment hosted micron gold deposits similar to the Carlin style deposits in the surrounding area. Its is worth noting that the low-sulfide micron deposits are a possibility not just at Navajo mountain, but would make good exploration targets for the La Sal mountains, the Henry mountains and the Blue mountains as well. Even though mining an prospecting are off-limits, Navajo mountain would be a great place to explore. There are several 14 mile trails that take you out to Rainbow Bridge—the worlds largest, free standing natural rock arch, as well as miles of forest and high desert. Take a camera. References: www.historytogo.utah.gov/people/ethnic-american-indian/chapter7.html, 2011. www.onlineutah.com/navajomountainhistory.shtml, 2011. Lapahie, Harrison, Jr., 2011, www.lapahie.com/navajomountain.cfm Potential for Alkaline Igneous Rock-Related Gold Deposits in the Colorado Plateau Laccolithic Centers, Felix Mutschler, Edwain Larsen and Micheal Ross,p. 232-252, Laccolithic Complexes of South Eastern Utah: Time Emplacement and Tectonics Setting—Workshop Proceedings, US Geological Survey Bulletin 2185, 1997.